THERMADOR _ SIEMENS _ BOSH & GAGGENAU – DISHWASHERS
DRAIN PUMP
Drain pumps are mounted to sumps in the front of dishwashers --
they’re easily accessible from the front of dishwashers by removing toe kicks.
To remove
& install drain pump
Tools needed: small flat blade screwdriver (for unlocking terminals).> Remove toe kick/base cover, pull up terminal cover and disconnect wires (using screwdriver to unlock locking terminals).> To remove pump, pull latch (on circular collar) & rotate pump clockwise (cw). To install new pump, insert @ 2:00 position & rotate counterclockwise (ccw).> Clean water & debris from base, then check float operation.> Connect wires, then install base cover & toe kick.
Tools needed: small flat blade screwdriver (for unlocking terminals).> Remove toe kick/base cover, pull up terminal cover and disconnect wires (using screwdriver to unlock locking terminals).> To remove pump, pull latch (on circular collar) & rotate pump clockwise (cw). To install new pump, insert @ 2:00 position & rotate counterclockwise (ccw).> Clean water & debris from base, then check float operation.> Connect wires, then install base cover & toe kick.
{See previous posts here for more details}
INSTALLATION TIPS
* Must
have drain hoses with high loops (min. 20” high), even with air gaps *.* Drain hoses can be up to 10’
long – can add up to 4’ to dishwasher hose.* Secure drain hoses to rear of
dishwashers with non-metal bands.* Make sure drain hoses aren’t
kinked.* UC/43 & later drain pumps
have (Rast 5) connectors, which aren’t interchangeable with older pumps with
spade terminals.
# Drain pump is rated 120V, 60 Hz, 35W, 0.85A.
# Drain pumps in installations with Johnson Tees (in Washington
State) must use stronger 4-vane pumps (#184178).
Standard 9-vane drain pumps (#167082)
are quieter and smoother than 4-vane pumps. Older pumps had 6-vanes.
# High loops are needed to prevent cavitating. Often improper installations, not drain pump
issues, cause dishwashers to not drain properly.

DISPENSERS_DISASSEMBLE PROCEDURE
CAUTION: Inner door edges are sharp. Cover door edges and remove dispenser
carefully.
To
remove/install dispensers
> Remove outer door, remove fascia panel & disconnect wire harness from fascia panel.
> Disconnect wire harness above dispenser, then remove wires to wax motor & sensor.
> Disconnect condensation tube (for older models with condensation tubes in doors).
> Remove any tape or wire ties. Bring replacement wire ties for reassembly.
> Bend retainer tabs, then push dispenser inward toward tank. Protect hand with towel as inner door edges are sharp.
> Replace from inside of tank - position O-ring seal and bend tabs to secure. Lubricate O-rings with rinse-aid & support inner doors to avoid damage if O-rings stick.

During each wash program, the wax motor opens twice, once to
dispense detergent and again to dispense rinse-aid. The wax motor opens the
same -- linkages open the detergent door & operate the rinse-aid dosage
plunger. Dispensers can have reed switches or optical rinse-aid sensors.
The white plastic linkage opens the detergent dispenser door, then
cocks in place to dispense rinse-aid when the wax motor operates again. After
the 2nd operation, the linkage resets for the next wash.
Optical dispensers have different connections and can’t be
substituted for reed switch dispensers. Note 431413 top load dispensers also use solenoid actuators
instead of wax motors.
OPTICAL SENSOR DISPENSERS
Optical and top-load dispensers measure rinse-aid levels with
optical sensors instead of reed switches.


DOOR LATCHES
Other than occasional misalignment, the only door latch repairs
will be replacing micro switches. OlderSHU43/53/68 dishwashers used door
latches with rods connecting them with on/off switches. [Use only latches specified for each model.
Latches can have differing closing forces, be suitable for specific door seals
& can have child locks.]
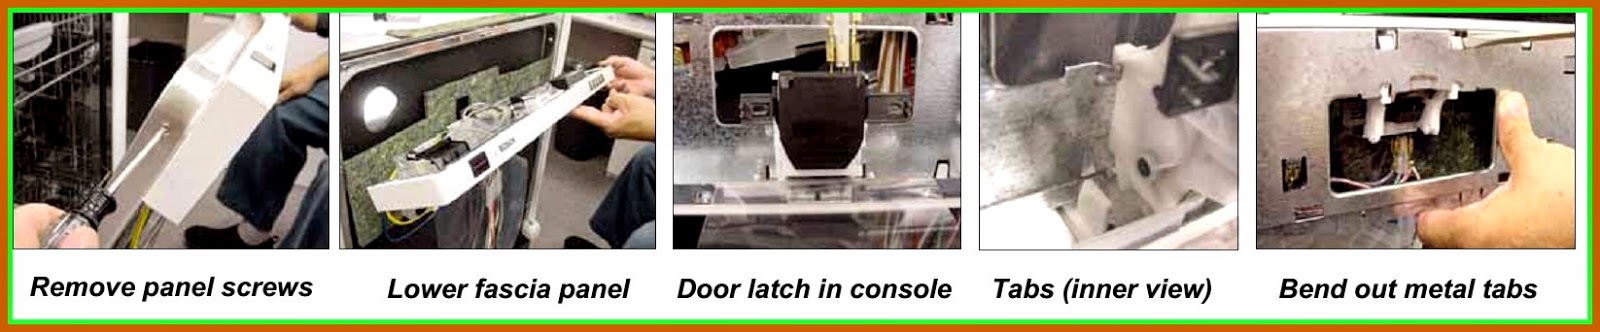
* Remove
T-20 Torx fascia panel screws from inner door.
* Lower fascia panel from door.
* Locate door latch in console.
* Bend out console metal tabs to allow latch removal.
* Lower fascia panel from door.
* Locate door latch in console.
* Bend out console metal tabs to allow latch removal.
{Door latches for UC/14 & up models are different than UC/06 -
UC/12 models; they cannot be interchanged. Must replace strike plate & door
latch together.}
AQUA SENSORS

The aqua sensor only affects energy usage, eliminating a pre-wash
and/or pre-rinse cycle if water is clean. Most customers won’t notice if an
aqua sensor fails. It’s located on the rear of the sump and can be reached
through the left side of the dishwasher (after the left side panel is removed –
see page 4). It’s not necessary to block up the tank to reach the aqua sensor.
To change out the aqua sensor, pull off the connector and pull out
the aqua sensor (toward the rear of the dishwasher). The aqua sensor slides
into slots in the sump. Make sure the aqua sensor is properly inserted into the
slots.
The Apexx Sensotronic 2 aqua
sensor # 175340is similar to
standard aqua sensor #165279,
except it has two (red &
green) soil sensors. They mount
the same way, but are not interchangeable.
CLICK ON THE PICTURES TO MAGNIFY