Toshiba
19DV555DB, 19DV555DG, 19DV556DB, 19DV556DG 19 - inch Diagonal LCD TV/DVD COMBINATION
– service mode, power section circuit diagram, software update, memory IC
replacement and more
Parental control - rating level 4 digit password cancellation
If
the stored 4 digit password in the Rating Level menu needs to be cancelled,
please follow the steps below.
Turn Unit ON.
Set the DVD to the Stop Mode.
Check that “No disc” is displayed on the screen.
Press and hold the “STOP” button on the side panel.
Simultaneously press and hold the “7” key on the remote control unit.
Hold both keys for more than 2 seconds.
The On Screen Display message “PASSWORD CLEAR” will appear.
The 4 digit password has now been cleared.
Tray lock
The
disk cannot be taken out by setting the Tray Lock, please follow the steps
below.
Turn Unit ON.
Set the DVD to the Stop Mode.
Press it in order of “SETUP”, “SUBTITLE”, “3”, “AUDIO SELECT” and “0” key of a remote control unit.
The On Screen Display message will appear.
The Tray Lock has now been set up.
Turn Unit ON.
Set the DVD to the Stop Mode.
Press it in order of “SETUP”, “SUBTITLE”, “3”, “AUDIO SELECT” and “0” key of a remote control unit.
The On Screen Display message will appear.
The Tray Lock has now been set up.
To
unlock the Tray Lock, please follow the steps below.
Turn Unit ON.
Set the DVD to the Stop Mode.
Press it in order of “SETUP”, “SUBTITLE”, “3”, “AUDIO SELECT” and “0” key of a remote control unit.
The On Screen Display message will appear.
The Tray Lock has now been cleared.
Turn Unit ON.
Set the DVD to the Stop Mode.
Press it in order of “SETUP”, “SUBTITLE”, “3”, “AUDIO SELECT” and “0” key of a remote control unit.
The On Screen Display message will appear.
The Tray Lock has now been cleared.

Hotel mode function
To
set the Hotel mode, please follow the steps below.
In power on mode, set the VOLUME to minimum.
Press and hold the VOLUME DOWN button on the side panel.
Simultaneously press and hold the channel button (7) on the remote control for more
than 2 seconds.
The Hotel mode setting menu will appear.
Using the UP/DOWN button on the remote control, select the desired item.
Then press the ENTER button.
Using the LEFT/RIGHT button on the remote control, set the item to desired setting.
The Hotel mode has now been set up.
To
reset the Hotel mode, follow the steps below.
In power on mode, set the VOLUME to minimum.
Press and hold the VOLUME DOWN button on the side panel.
Simultaneously press and hold the channel button (7) on the remote control for more
than 2 seconds.
The Hotel mode setting menu will appear.
Using the UP/DOWN button on the remote control, select the RESET.
Then press the ENTER button.
The setting items have now been returned to initial value.
Even
if setting it to “No Respond”, the remote control key operation in Hotel mode
and service mode function are effective.
Even if setting it to “No Respond”, the service mode function are effective.
If setting it to “OFF”, it start up in same input source when you turn off the power before.
Even if setting it to “No Respond”, the service mode function are effective.
If setting it to “OFF”, it start up in same input source when you turn off the power before.
Disc removal method at no power supply
Remove
the Back Cabinet and Angle Deck.
Slide the Belt Loading toward the arrow direction by hand to release the lock.
Take out the Disc from the DVD Deck. Be careful not to scratch on the Disc.
Slide the Belt Loading toward the arrow direction by hand to release the lock.
Take out the Disc from the DVD Deck. Be careful not to scratch on the Disc.

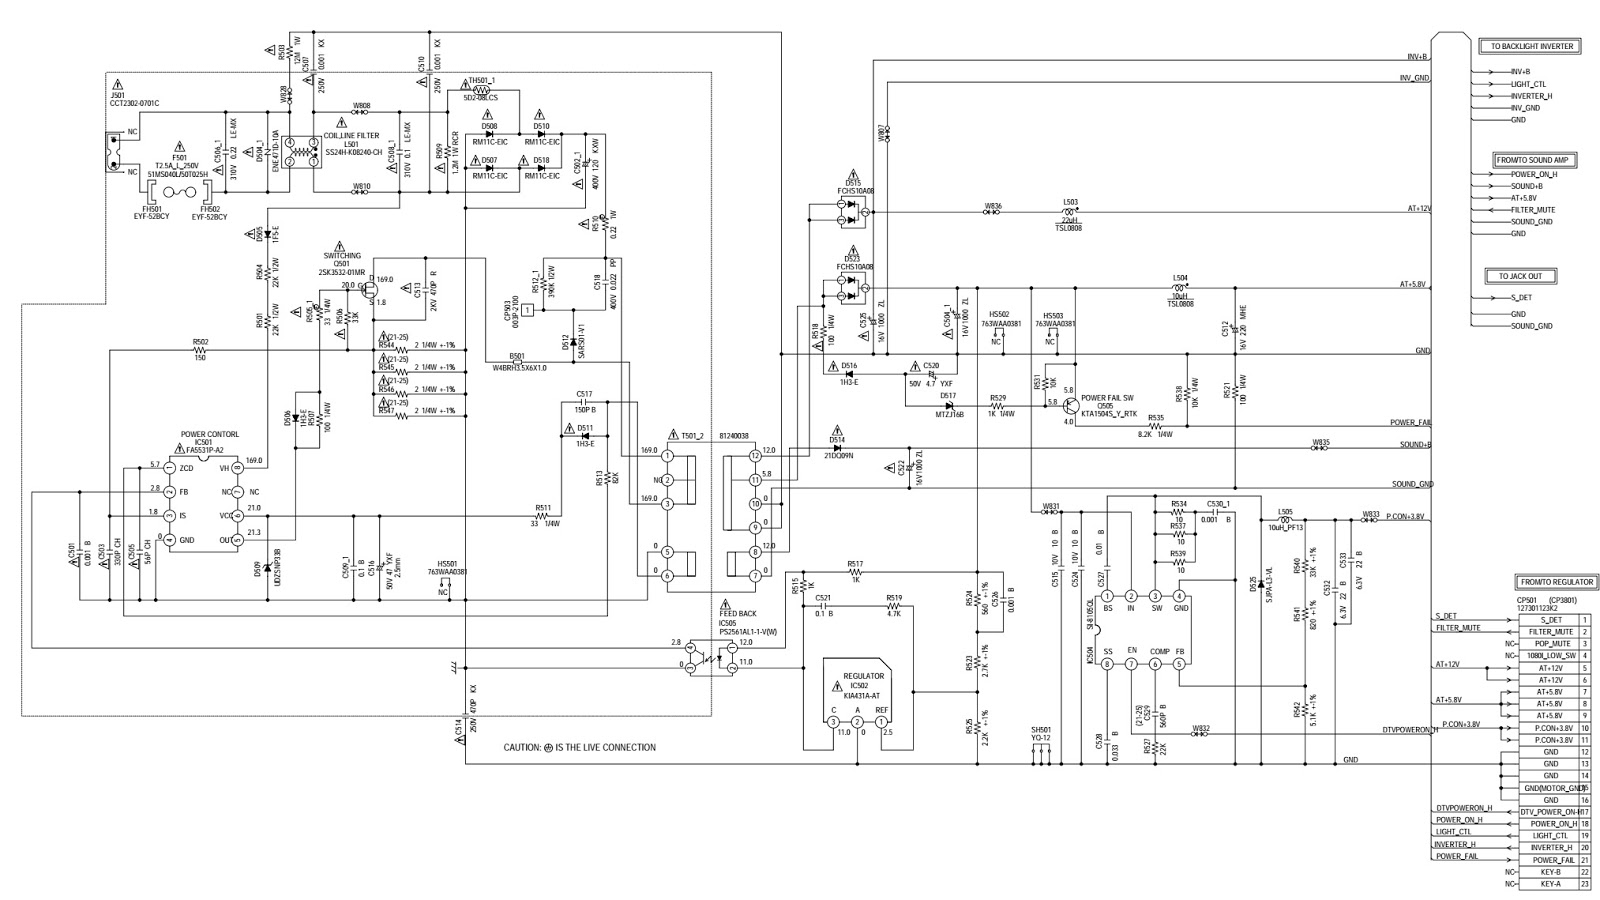
SMPS schematic
Power in-out schematic

Back-light inverter schematic

Service mode
This
unit provided with the following SERVICE MODES so you can repair, examine and
adjust easily.
To enter to the SERVICE MODE function, press and hold both buttons simultaneously on the main unit and on the remote control for more than a the standard time in the appropriate condition.
To enter to the SERVICE MODE function, press and hold both buttons simultaneously on the main unit and on the remote control for more than a the standard time in the appropriate condition.

Re-write for DVD firmware
Up-Date Disc - JG176
Turn
on the power, and set the DVD mode.
Confirm that the "No Disc" will be appeared on the screen.
Press both VOL. DOWN button on the set and Channel button (5) on the remote control for more than 2 seconds.
Press VOL. UP/DOWN button on the unit to check if all the keys on the unit do not function.
NOTE: To check if DVD Write mode is set.
When inserting Up-Date Disc at Non DVD Write mode, the read error will happen.
Insert the Up-Date Disc. (Refer to SERVICING FIXTURE AND TOOLS)
Automatic read will start and "Firmware upgrade Please Wait" will be displayed on the screen.
At this time, the horizontal noise lines may appear. But no problem.
NOTE: Do not turn off the unit on the way or operate the keys on the unit and remocon.
Up-Date error will happen and can not be done with the Up-Date of Up-Date Disc.
After
the Up-Date, Logo screen will appear.
Unplug the AC cord, then plug it in.
After the write, set to the initializing of shipping.
Turn on the power, and set the DVD mode.
Press both VOL. DOWN button on the set and Channel button (4) on the remote control for more than 2 seconds.
The "INITIALIZE 5 ---> COMPLETE" will appear on the screen.
Then unplug the AC cord, and plug it in.
CHECK FOR THE FIRMWARE VERSION
Turn on the power, and set the DVD mode.
Press both Channel button (1) on the remote control and the STOP button on the set for more than 2 seconds.
Firmware version will be displayed on the top left of the screen.
When
the changed version displays, the Re-write will be completed
Turn
off the power.

Replacing EEPROM (memory) IC
Confirmation
of check sum, power on total hours and MICOM version
Initial
total of MEMORY IC, POWER ON total hours and MICON VERSIONcan be checked on the
screen. Total hours are displayed in 16 system of notation.
[If
you set a factory initialization, the total hours is reset to "0".
refer to "CONFIRMATION OF INITIAL DATA" when SUM DATA is not
corresponding.]
Turn
on the POWER, and set to the TV mode.
Set the VOLUME to minimum.
Press both VOL. DOWN button on the set and Channel button (2) on the remote control for more than 2 seconds.
After the confirmation of each check sum, turn off the power.
Set the VOLUME to minimum.
Press both VOL. DOWN button on the set and Channel button (2) on the remote control for more than 2 seconds.
After the confirmation of each check sum, turn off the power.
Confirmation of initial data
If
a service repair is undertaken where it has been required to change the MEMORY
IC, the following steps should be taken to ensure correct data settings while
making reference to INITIAL SETTING TABLE
Turn
on the POWER, and set to the TV mode.
Set the VOLUME to minimum.
Press both VOL. DOWN button on the set and Channel button (6) on the remote control for more than 2 seconds.
ADDRESS and DATA should appear.
Set the VOLUME to minimum.
Press both VOL. DOWN button on the set and Channel button (6) on the remote control for more than 2 seconds.
ADDRESS and DATA should appear.
[No
need to set data other position than 0D00~0E3F and 1000~7FFF]
ADDRESS
is now selected and should "blink". Using the UP/DOWN buton on the
remote, step through the ADDRESS until required ADDRESS to be changed is
reached.
Press LEFT/RIGHT button to select DATA. When DATA is selected, it will "blink".
Again, step through the DATA using UP/DOWN button until required DATA value has been selected.
Pressing LEFT/RIGHT button will take you back to ADDRESS for further selection if necessary.
Repeat steps 4 to 6 until all data has been checked.
When satisfied correct DATA has been entered, turn POWER off (return to STANDBY MODE) to finish DATA input.

After the data input, set to the initializing of shipping.
Turn on the POWER.
Set the VOLUME to minimum
Turn on the POWER.
Set the VOLUME to minimum
Press
both VOL. DOWN button on the set and Channel button (1) on the remote control
for more than 2 seconds.
After
the finishing of the initializing of shipping, the unit will turn off
automatically.
The
unit will now have the correct DATA for the new MEMORY IC.