How to set up the service mode
1. Use
the service remote control unit.
2. Turn the power on. (Use main power on the TV unit.)
3. Press [DISC MENU] button on the service remote control unit. Version of micro computer will be displayed on the LCD or display. (Ex: A95FP-0.23)
2. Turn the power on. (Use main power on the TV unit.)
3. Press [DISC MENU] button on the service remote control unit. Version of micro computer will be displayed on the LCD or display. (Ex: A95FP-0.23)
How to make Service remote control unit
Prepare
normal remote control unit (Part No. NE240UD). Remove 3 screws from the back
lid.
Cut
off pin 10 of the remote control.
microprocessor and short circuit pins 10 and
17 with a jumper wire.


Initial Setting
General: Enter the Service mode. Set the each initial data as shown on table below
General: Enter the Service mode. Set the each initial data as shown on table below

Flicker Adjustment
1. Enter the Service mode.
2. Press [2] button on the remote control unit. The following screen appears.
If
Flicker Adjustment is not fit, the screen becomes the following.1. Enter the Service mode.
2. Press [2] button on the remote control unit. The following screen appears.
Press
[CH. UP / DN] buttons on the remote control unit so that flash stops.

White Balance Adjustment
Purpose: To mix red, green and blue beams correctly for pure white.
Symptom of Misadjustment: White becomes bluish or reddish.
Purpose: To mix red, green and blue beams correctly for pure white.
Symptom of Misadjustment: White becomes bluish or reddish.
Use
the remote control unit.
1. Operate the unit for more than 20 minutes.
2. Input the White Purity (APL 80%).
3. Set the color analyzer to the CHROMA mode and bring the optical receptor to the center on the LCD-Panel surface after zero point calibration as shown.
1. Operate the unit for more than 20 minutes.
2. Input the White Purity (APL 80%).
3. Set the color analyzer to the CHROMA mode and bring the optical receptor to the center on the LCD-Panel surface after zero point calibration as shown.

Note:
The optical receptor must be set perpendicular to the LCD Panel surface.
[RF/VIDEO1]
Enter the Service mode.
[RF/VIDEO1]
Enter the Service mode.
Press “VOL DN” button on the remote control unit and
select “C/D1-” mode.
[VIDEO2]
Enter the Service mode.
[VIDEO2]
Enter the Service mode.
Press “VOL DN” button on the remote control unit and
select “C/D2-” mode.
[RF/VIDEO1]
When “x” value and “y” value are not within specification, adjust “DB (C/D1)” or “DR (C/D1)”.
Refer to “1. Initial Setting.”
Note: “DB(C/D1)” or “DR(C/D1)” must be adjusted within ±0.01.
[VIDEO2]
When “x” value and “y” value are not within specification, adjust “DB(C/D2)” or “DR(C/D2)”.
Refer to Initial Setting.”
Note: “C-DB(C/D2)” or “C-DR(C/D2)” must be adjusted within ±0.01.
Turn the power off and on again. (Main power button on the TV unit.)
To initialize the lCD TV/DVD
To
put the program back at the factory-default, initialize the LCD TV/DVD as the
following procedure
DVD Section
1. Press [1], [2], [3], [4], and [DISPLAY] buttons on the remote control unit in that order.
1. Press [1], [2], [3], [4], and [DISPLAY] buttons on the remote control unit in that order.
Press
[CLEAR] button on the remote control unit.
When
“OK” appears on the screen, the factory default will be set.
3. To exit this mode, press [CH. UP/DN] or [SELECT] button to go to TV mode, or press [POWER] button to turn the power off.
3. To exit this mode, press [CH. UP/DN] or [SELECT] button to go to TV mode, or press [POWER] button to turn the power off.
LCD TV Section
1. Turn the power on. (Use main power on the TV unit.)
2. To enter the service mode, press [DISC MENU] button on the service remote control unit.
- To cancel the service mode, press [POWER] button on the remote control.
3. To initialize the LCD television, press [DISPLAY] button on the remote control unit.
4. Confirm "FF" indication on the upper right of the screen.
5. Unplug the AC cord.
Firmware renewal1. Turn the power on. (Use main power on the TV unit.)
2. To enter the service mode, press [DISC MENU] button on the service remote control unit.
- To cancel the service mode, press [POWER] button on the remote control.
3. To initialize the LCD television, press [DISPLAY] button on the remote control unit.
4. Confirm "FF" indication on the upper right of the screen.
5. Unplug the AC cord.
1. Turn
the power on and press [EJECT] button on the remote control unit to put the LCD
TV/DVD into DVD mode. Then remove the disc.
2. To put the LCD TV/DVD into F/W version up mode, press [9], [8], [7], [6], and [SEARCH MODE] buttons on the remote control unit in that order.
Firmware update screen appears.
2. To put the LCD TV/DVD into F/W version up mode, press [9], [8], [7], [6], and [SEARCH MODE] buttons on the remote control unit in that order.
Firmware update screen appears.
3.
Insert the disc for version up into the disc slot.
4. The LCD TV/DVD enters the F/W version up mode automatically.
4. The LCD TV/DVD enters the F/W version up mode automatically.
If you enter the F/W for different models, “Disc Error” will
appear on the screen, then the disc will be ejected automatically.
5.
After programming is finished, the disc will be ejected automatically, and the checksum will be shown.
At
this time, no button is available.
6. Remove the disc.
7. Press [CH. UP/DN] button on the unit to go to TV mode, or press [POWER] button on the unit to turn the power off.
8. Press [EJECT] button on the remote control unit to put the LCD TV/DVD into DVD mode again.
9. Press [1], [2], [3], [4], and [DISPLAY] buttons on the remote control unit in that order.
10.Press
[CLEAR] button on the remote control unit.
When
“OK” appears on the screen, the factory default will be set. Then the firmware
renewal mode is complete.
11.To exit this mode, press [CH.UP/DN] or [SELECT] button to go to TV mode, or press [POWER] button to turn the power off.
11.To exit this mode, press [CH.UP/DN] or [SELECT] button to go to TV mode, or press [POWER] button to turn the power off.
Voltage indications for PLAY and STOP modes on the schematics
are as shown

How to Eject Manually
1. Remove the Rear Cabinet.
2. To remove the Loader PCB Holder with the DVD Main CBA Unit, remove three screws.
Do not disconnect connectors.
3. To remove the Chassis Cover, remove 4 screws A as shown in Fig.
4. Remove a disc.
1. Remove the Rear Cabinet.
2. To remove the Loader PCB Holder with the DVD Main CBA Unit, remove three screws.
Do not disconnect connectors.
3. To remove the Chassis Cover, remove 4 screws A as shown in Fig.
4. Remove a disc.

Reassembly
note of the Chassis Cover:
Insert the pin A on the Chassis Cover into the hole A on the Main Chassis as shown in above Fig.
Insert the pin A on the Chassis Cover into the hole A on the Main Chassis as shown in above Fig.
Audio section schematic: Main PWA

Inverter Schematic and PWA


Power (SMPS) Schematic: Main CBA

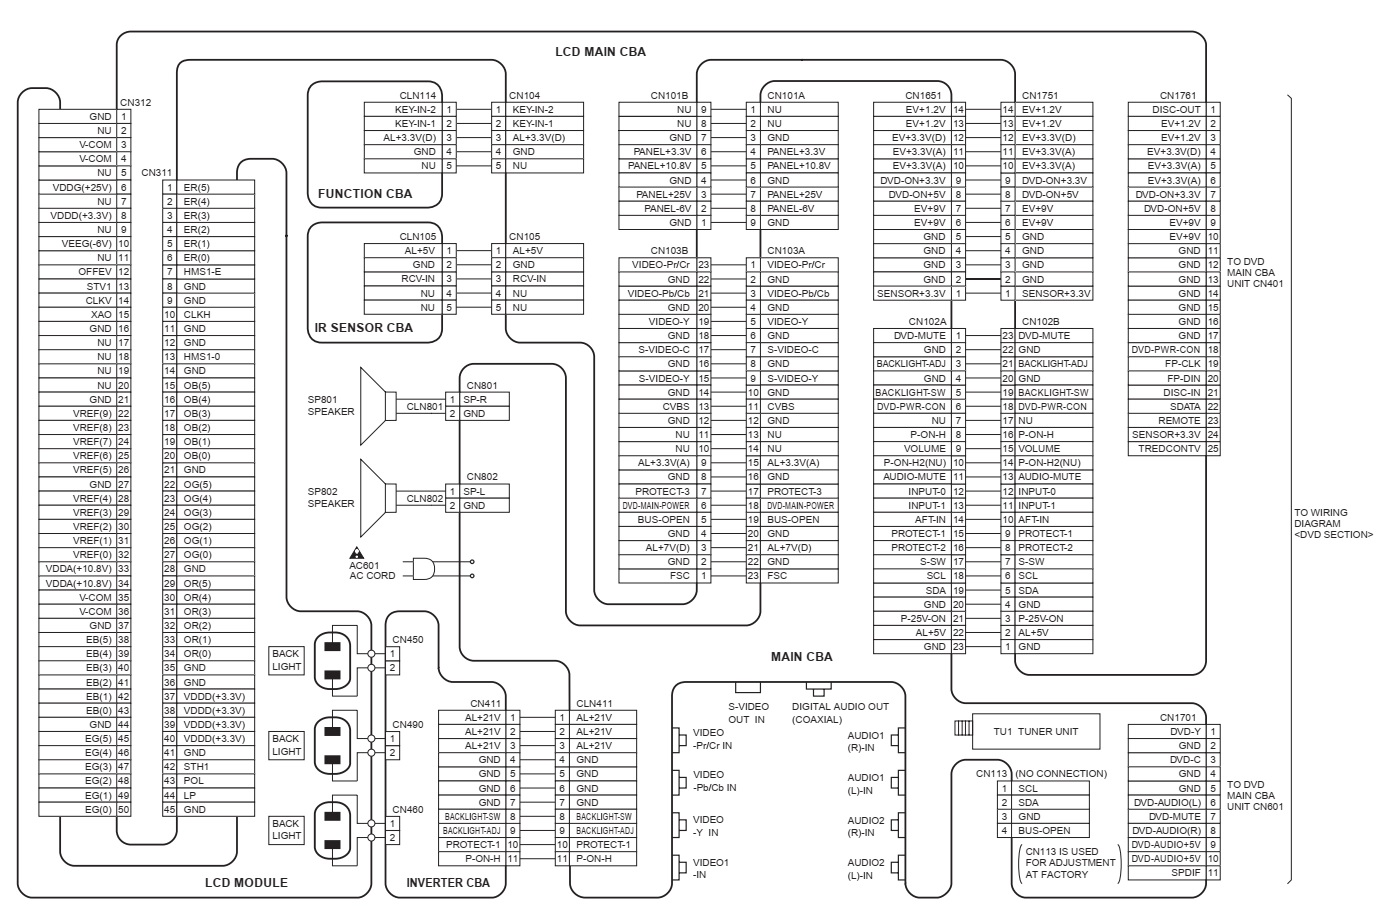
Wiring diagram