CD
section
Model
Name Using Similar Mechanism - HCD-RG121
CD
Mechanism Type: CDM74-K6BD80
Optical
Pick-up Name: KSM-213DCP/Z-NP
Tape
deck section
Model
Name Using Similar Mechanism - HCD-RG121
Tape
Transport Mechanism Type: CWM43FF-05
Amplifier
section
AUDIO
POWER SPECIFICATIONS
DIN power output (rated): 15 + 15 watts (6 ohms at 1 kHz, DIN)
Continuous RMS power output (reference):
20 + 20 watts (6 ohms at 1 kHz, 10% THD)
Music power output (reference)
40 + 40 watts (6 ohms at 1 kHz, 10% THD)
DIN power output (rated): 15 + 15 watts (6 ohms at 1 kHz, DIN)
Continuous RMS power output (reference):
20 + 20 watts (6 ohms at 1 kHz, 10% THD)
Music power output (reference)
40 + 40 watts (6 ohms at 1 kHz, 10% THD)
SPEAKER:
accepts impedance of 6 to 16 ohms.


The
laser beam on this model is concentrated so as to be focused on the disc
reflective surface by the objective lens in the optical pickup block.
Therefore, when checking the laser diode emission, observe from more than 30 cm
away from the objective lens.
The release method of a CD disc tray LOCK function
There
is a disc lock function for the disc theft prevention for a demonstration at a
shop front in this machine.
Procedue:
1. Press the POWER button to turn the set on.
2. Press two buttons of STOP and (EJECT) simultaneously for five seconds.
3. The message “LOCKED” is displayed and the tray is locked. (Even if exiting from this mode, the tray is still locked.)
4. Press two buttons of STOP and (EJECT) simultaneously for five seconds again.
5. The message “UNLOCKED” is displayed and the tray is unlocked.
6. To exit from this mode, press the POWER button to turn the set off.
CD changer mechanism [exploded] [CD changer fittings]


[Change-over
of AM Tuner Step between 9 kHz and 10 kHz]
A
step of AM channels can be changed over between 9 kHz and 10 kHz.
1. Press
POWER button to turn the set ON.
2. Select the function “TUNER”, and press TUNER/BAND button to select the BAND “AM”.
2. Select the function “TUNER”, and press TUNER/BAND button to select the BAND “AM”.
3.
Press the POWER button to turn the set off.
4.
Press TUNER/BAND and POWER buttons simultaneously, and the display of fluorescent
indicator tube changes to “AM 9 k STEP” or “AM 10 k STEP”, and thus the channel
step is changed over.
[Cold Reset]
The cold reset clears all data including preset data stored in the RAM to initial
conditions. Execute this mode when returning the set to the customer.
1. Press
three buttons STOP , PLAY MODE/TUNING MODE and DISC1 simultaneously.
2. The fluorescent indicator tube displays “COLD RESET” and the set is reset.
2. The fluorescent indicator tube displays “COLD RESET” and the set is reset.
[Aging Mode]
This mode can be used for operation check of CD section and tape deck section.
This mode can be used for operation check of CD section and tape deck section.
If an error occurred:
The aging operation stops and is displayed status.
If no error occurs:
The aging operation continues repeatedly.
The aging operation stops and is displayed status.
If no error occurs:
The aging operation continues repeatedly.
Operating method of Aging Mode
Turn on the main power and select “CD” of the function.
1) Set three discs in tray. Select ALL DISCS, and REPEAT OFF.
2) Load the tapes recording use into both decks.
3) Press three buttons STOP , PLAY MODE/TUNING MODE , and DISK SKIP/EX-CHANGE simultaneously.
4) Aging operations of CD and tape are started at the same time.
5) To exit the aging mode, perform [Cold Reset].
Aging mode in CD section
1) Operation during aging mode
In the agining mode ,the program is executed in the following sequence.
(1) The disc tray opens and closes.
(2) The disc tray turns to select a disc 3.
(3) The pick-up accesses to the first track, and plays 3 seconds.
(4) The pick-up accesses to the last track, and plays 3 seconds.
(5) The disc tray opens and closes.
(6) The disc tray turns to select a disc 1.
(7) The same operation starts like step (3).
(8) After a disc 1 aging operation, a disc 2 is selected.
(9) When an aging operation of a disc 3 is completed, the display “AGING ∗∗∗∗” value increases.
(10) If no error occurs, the aging operation continues repeatedly.
Error display

Aging
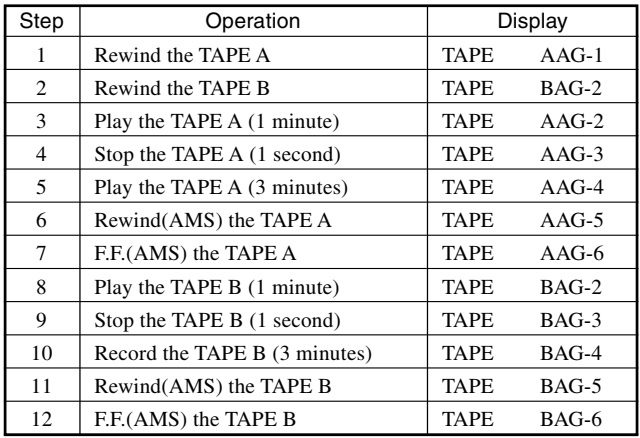
mode in Tape Deck section
1) Operation during aging mode
In the aging mode, the program is executed in the following sequence.
1) Operation during aging mode
In the aging mode, the program is executed in the following sequence.
Error
display
If error occurred, the display remains like “TAPE BAG-2”.
4. Exiting from the aging mode
Be sure to perform Cold Reset to exit from the aging mode.
If error occurred, the display remains like “TAPE BAG-2”.
4. Exiting from the aging mode
Be sure to perform Cold Reset to exit from the aging mode.
Procedure:
1. Press POWER button to turn the set ON.
1. Press POWER button to turn the set ON.
2.
to enter the test mode, press the three buttons STOP, PLAY MODE/TUNING MODE and
ENTER simultaneously.
3.
All segments and LEDs (without STANDBY LED) are turned on.
4. Press PAUSE and ENTER buttons simultaneously, and the key check mode is activated.
4. Press PAUSE and ENTER buttons simultaneously, and the key check mode is activated.
5.
The message “KEY 0 0 0” is displayed.
Each time a button is pressed, the key code number is displayed.
6. Press PAUSE and ENTER buttons simultaneously, and the key count mode is activated.
7. The message “KEYCNT 0” is displayed.
Each time a button is pressed, “KEYCNT 0” value increased. However, once a button is pressed, it is no longer taken into account.
8.
Press PAUSE and ENTER buttons simultaneously, and the head phone detect mode is
activated.
9. The message “H_P OFF” is displayed when a headphone jack is not inserted.
“H_P ON ” is displayed when a headphone jack is inserted.
10. Press PAUSE and ENTER buttons simultaneously, and the volume control detect mode is activated.
9. The message “H_P OFF” is displayed when a headphone jack is not inserted.
“H_P ON ” is displayed when a headphone jack is inserted.
10. Press PAUSE and ENTER buttons simultaneously, and the volume control detect mode is activated.
11.
The message “VOLUME FLAT” is displayed.
“VOLUME UP” is displayed if rotating MASTER VOLUME knob clockwise, or “VOLUME DOWN” is displayed if rotating counterclockwise.
12. To exit from the GC test mode after the head phone detect mode, press PAUSE and ENTER buttons simultaneously.
“VOLUME UP” is displayed if rotating MASTER VOLUME knob clockwise, or “VOLUME DOWN” is displayed if rotating counterclockwise.
12. To exit from the GC test mode after the head phone detect mode, press PAUSE and ENTER buttons simultaneously.
[Version and Destination
Display Mode]
The version or destination is displayed.
The version or destination is displayed.
1. Press
POWER button to turn the set ON.
2. To enter the test mode, press the three buttons STOP, PLAY MODE/TUNING MODE and DISC2 simultaneously.
2. To enter the test mode, press the three buttons STOP, PLAY MODE/TUNING MODE and DISC2 simultaneously.
3.
The destination is displayed.
4. Press DISPLAY buttons simultaneously.
5. The version is displayed.
6. To exit from this mode, press POWER button to turn the set OFF.
4. Press DISPLAY buttons simultaneously.
5. The version is displayed.
6. To exit from this mode, press POWER button to turn the set OFF.
Schematic [Circuit diagram]


[AMP TEST MODE]
Procedure:
1. Press POWER button to turn the set ON.
2. To enter the test mode, press the three buttons STOP, PLAY MODE/TUNING MODE and ENTER simultaneously.
Procedure:
1. Press POWER button to turn the set ON.
2. To enter the test mode, press the three buttons STOP, PLAY MODE/TUNING MODE and ENTER simultaneously.
3.
Press the DISPLAY button.
The message “V0 0 0” “ 000” is displayed.
4. Press the GROOVE button.
The message “V0 0 0” “ 000” is displayed.
4. Press the GROOVE button.
The
message “DBFB ON” “DBFB OFF” is displayed.
5. Press the SURROUND button.
The message “SURROUND ON” “SURROUND OFF” is displayed.
6. Press the EQ BAND button. The message “LOW” “MID” “HIGH” is displayed.
5. Press the SURROUND button.
The message “SURROUND ON” “SURROUND OFF” is displayed.
6. Press the EQ BAND button. The message “LOW” “MID” “HIGH” is displayed.
7. Press POWER button to turn the set OFF.

[CD Service Mode]
This mode can run the CD sled motor freely. Use this mode, for instance, when cleaning the pick-up.
This mode can run the CD sled motor freely. Use this mode, for instance, when cleaning the pick-up.
Procedure:
1. Press POWER button to turn the set ON.
2. Select the function “CD”.
3. To enter the test mode, press three buttons STOP, PLAY MODE/TUNING MODE , and EJECT simultaneously.
1. Press POWER button to turn the set ON.
2. Select the function “CD”.
3. To enter the test mode, press three buttons STOP, PLAY MODE/TUNING MODE , and EJECT simultaneously.
4.
The CD service mode is selected.
5.
With the CD in stop status, press >> button to move the pickup to outside
track, ore press << button to inside track.
6.
To exit from this mode, perform as follows:
1) Move the pick-up to the most inside track.
2) Press POWER button to turn the set OFF.
1) Move the pick-up to the most inside track.
2) Press POWER button to turn the set OFF.
Note:
• Always move the pick-up to most inside track when exiting from this mode.
Otherwise, a disc will not be unloaded.
Do not run the sled motor excessively; otherwise the gear can be chipped.
Do not run the sled motor excessively; otherwise the gear can be chipped.
[MC Test Mode]
This mode is used to test the function of the equalizer.
This mode is used to test the function of the equalizer.
Procedure:
1. Press POWER button to turn the set ON.
2. To enter the test mode, press the three buttons STOP, PLAY MODE/TUNING MODE and DISC-3 simultaneously.
1. Press POWER button to turn the set ON.
2. To enter the test mode, press the three buttons STOP, PLAY MODE/TUNING MODE and DISC-3 simultaneously.
3.
Press the EQ+ button. The function of
the equalizer is set to “MIN”.
4. Press the EQ– button. The function of the equalizer is set to “MAX”
4. Press the EQ– button. The function of the equalizer is set to “MAX”
5.
Press the PRESET EQ button. The function
of the equalizer is set to “EQ FLAT”.
6. MASTER VOLUME up and down. “VOLUME MIN”, “VOLUME 16”, “VOLUME MAX” is displayed.
6. MASTER VOLUME up and down. “VOLUME MIN”, “VOLUME 16”, “VOLUME MAX” is displayed.
7.
Press GROOVE button. The message “VACS
OFF” on “VACS ON” is displayed.
8. To exit from this mode, press POWER button to turn the set OFF.
8. To exit from this mode, press POWER button to turn the set OFF.
[CD Ship Mode (LOCK) ]
This mode moves the pick-up to the position durable to vibration. Use this mode when returning the set to the customer after repair.
This mode moves the pick-up to the position durable to vibration. Use this mode when returning the set to the customer after repair.
1. Press
POWER button to turn the set ON.
2. Select the function “CD”.
5. Press the POWER button to turn the set off.
2. Select the function “CD”.
5. Press the POWER button to turn the set off.
4.
Press CD button and POWER button simultaneously.
5.
The “STANDBY” display blinks instantaneously, and the CD ship mode is set.
[CD Ship (LOCK) & COLD RESET MODE]
Procedure:
1. Press POWER button to turn the set ON.
2. Select the function “CD”.
3. Press POWER button to turn the set OFF.
4. Press three buttons STOP, CD and DISPLAY simultaneously.
Procedure:
1. Press POWER button to turn the set ON.
2. Select the function “CD”.
3. Press POWER button to turn the set OFF.
4. Press three buttons STOP, CD and DISPLAY simultaneously.
5.
The “STANDBY” display blinks instantaneously and CD ship mode is set.
6. The fluorescent indicator tube displays “COLD RESET” and the set is reset.
6. The fluorescent indicator tube displays “COLD RESET” and the set is reset.
[Disc Tray Lock]
1. Press
the POWER button to turn the set ON.
2. Press two buttons of STOP & EJECT simultaneously for five seconds.
2. Press two buttons of STOP & EJECT simultaneously for five seconds.
3.
The message “LOCKED” is displayed and the tray is locked. (Even if exiting from this mode, the tray is
still locked.)
4. Press two buttons of STOP & EJECT simultaneously for five seconds again.
4. Press two buttons of STOP & EJECT simultaneously for five seconds again.
5.
The message “UNLOCKED” is displayed and the tray is unlocked.
6. To exit from this mode, press the POWER button to turn the set OFF.
6. To exit from this mode, press the POWER button to turn the set OFF.
[CD Repeat 5 Times Limit Release Mode]
Procedure:
1. Press POWER button to turn the set ON.
2. Select the function “CD”.
3. Press three buttons STOP CD and ENTER simultaneously.
Procedure:
1. Press POWER button to turn the set ON.
2. Select the function “CD”.
3. Press three buttons STOP CD and ENTER simultaneously.
4.
The message “LIMIT OFF” is displayed.
5. Press POWER button the set OFF.
5. Press POWER button the set OFF.