AEP Model, UK Model, E
Model. STR-KSL50 is the receiver section
in HT-SL50.
TEST MODE.
FACTORY PRESET MODE
*
All preset contents are reset to the default setting.
* Procedure:
While depressing the PLII and the PRESET TUNING + buttons simultaneously, press
the power button to turn on the main power.
The message “FACTORY” appears and the present contents are reset to the default
values.
RDS AUTOBETICAL MODE
*
This mode is installed in the Europe models only. When this mode is used, the
receiver scans the broadcasts that can be received by the tuner, and sets up
the broadcasts. Be sure to start scanning after connecting the antenna.
* Procedure :
1. Check that the antenna is connected.
2. While depressing the INPUT SELECTOR button, press the Power button to turn
on the main power.
3. The message “AUTO-BETICAL SELECT” appears and the receiver starts scanning.
MICRO/NORMAL SPEAKER SELECTION MODE
*
Either the micro speaker mode or normal speaker mode can be selected.
* Procedure
While depressing the MUTING button, press the power button to turn on the main
power. Either the message “MICRO SP.” or “NORM. SP.” appears. Select the
desired mode.
SOUND FIELD CLEAR MODE
*
The preset sound field is cleared when this mode is activated.
Use this mode before returning the product to clients upon completion of
repair.
* Procedure:
While depressing the SOUND FIELD button, press the power button to turn on the main power. The message “SF.
CLR” appears and initialization is performed.
ALL CLEAR MODE
*
The all preset value is cleared when this mode is activated.
* Procedure :
While depressing the PLII and the PRESET TUNING – buttons simultaneously, press
the power button to turn on the main power.
The message “CLEARED” appears and clear all preset value.
SOFTWARE VERSION DISPLAY MODE
*
The software version is displayed.
* Procedure:
While depressing the SOUND FIELD and the PRESET TUNING - buttons
simultaneously, press the power button
to turn on the main power. The model name, destination and the software version
are displayed.
KEY CHECK MODE
*
Button check
* Procedure:
While depressing the MUTING and the INPUT SELECTOR buttons simultaneously,
press the power button to turn on the
main power. “REST 06” appears.
Every pressing of any button other than Power counts down the buttons. The
buttons which are already counted once are not counted again. When all buttons
are pressed “REST 00” appears.
FLUORESCENT INDICATOR TUBE TEST MODE
*
All fluorescent segments are tested. When this test is activated, all segments
turn on at the same time, then each segment turns on one after another.
* Procedure:
While depressing the MUTING and the PRESET TUNING - buttons simultaneously,
press the power button to turn on the
main power.
1. All segments turn on.

4. Press the INPUT
SELECTOR button, all segments and LEDs turn off.
5. Every pressing of the INPUT SELECTOR button turns on each segment and LED
one after another in the same order.
TUNER CHECK MODE
*
Tuner check
* Procedure :
While depressing the SOUND FIELD and the INPUT SELECTOR buttons simultaneously,
press the power button to turn on the main power. “TUN CHK” appears and the tuner
checking is performed.
DSP TEST MODE
*
DSP tests are performed.
* Procedure :
There are two different methods to enter the test mode.
(1) While depressing the INPUT SELECTOR and PRESET TUNING - buttons
simultaneously, press the power button to
turn on the main power.
(2) When the set is turned on, by using the remote controller, press the ENTER
button three times, then press the MAIN MENU
button one time and then press the MUTING button one time.
• Select the item by pressing Cursor button ( UP OR DN ).
• Select the function by pressing Cursor button ( R OR L )
DSP test mode items

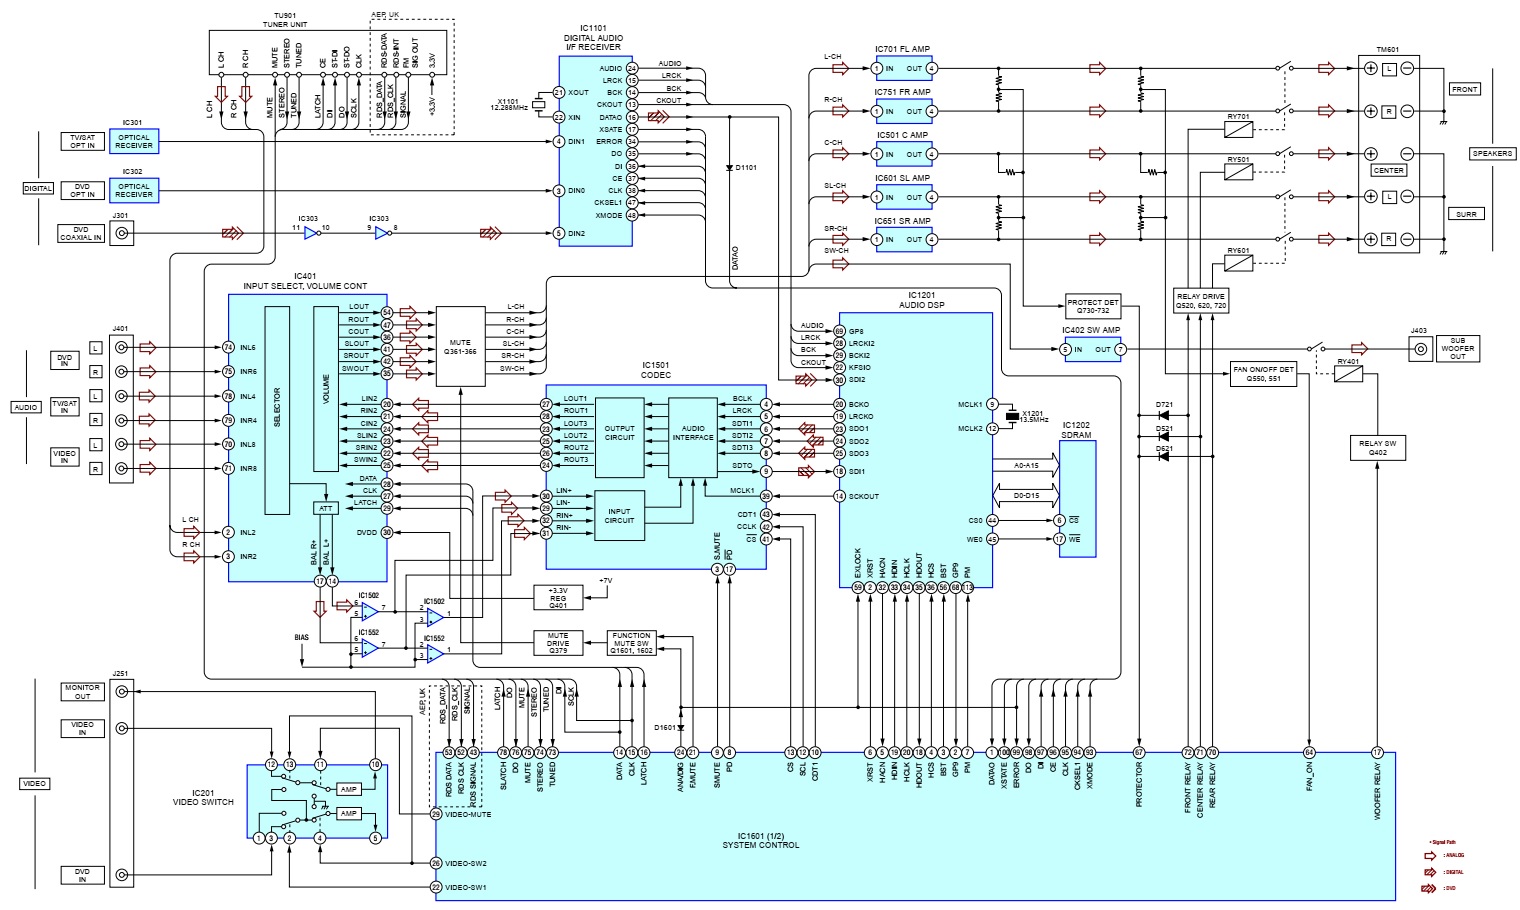
Sony STR-KSL50 block diagram
Main board PWB

Digital board PWB

Schematic Diagram – Digital (1/2) Section

Schematic Diagram – Digital (2/2) Section

Schematic Diagram – Main (1/2) Section

Schematic Diagram – Main (2/2)/Standby Section

Schematic Diagram – Display Section

No comments:
Post a Comment