Factory Menu & Main Menu, How to Enable Factory hotkey
Follow the below steps to
pop-up the Factory menu in case of “Factory
hotkey” is disabled:
Enable Factory hotkey method:
Method
one:
* Press RCU “MENU” key to
display main menu
* Select “SettingsàPictureàAdvanced
settingà Contrast”, Scroll down to
“Contrast” item
* Press the subsequence RCU keys “9”, “7”, “3” and “5”
* Select “9-Sita P mode”, Press
RCU “◄/►” key change the values
to ON
* Reboot TV
* 'Factory Hotkey' will be ON automatic.
Method
two:
* Create a file named 'sita-P'
with no suffix, note the capitalization.
* Put the file 'sita-P' into the U disk, delete all PKG and BINC files.
* Put the U disk into the TV.
* Power on TV by AC, at the same time press “power on” key which on the
boardfor 10s until the TCL logo show.
* 'Factory Hotkey' will be ON automatic.
If “Factory hotkey” is enabled, just press
RCU “Return” key to pop-up again the Factory menu.
The status of “Factory hotkey”
can be changed in “Factory menu->Factory hotkey”
Press RCU Ok►”key to enter the
submenu.
Press RCU “Menu” key to go back
to the root menu.
Press RCU “◄/►” key to change
the values.
Press RCU “OK” key run the
function.
Press RCU “Exit” key exit the
Factory menu.

Factory Captions Description
While “Factory hotkey” is enabled, there’re some toggled display information
(~2s) relative to SW, ProjectID, CI+, Network ID to facilitate 100% quick
screening without accessing to whatever else menu:
MV
(Main SW Version)
ID (Project ID)
Panel ID
MEMC (FRC SW Version)
MID(Internet info for factory)
P (Production - Factory mode flag) S (Factory UART Parser mode flag) W
(Warm-Up mode flag)
How
to enter Main Menu
* Press
RCU “MENU” key to display main
menu
* Select “Settings>Picture>Advanced
setting> Contrast”, Scroll down to
“Contrast” item
* Press the subsequence RCU keys “1”, “9”, “5” and “0”
* Then the Main Menu will be displayed on the screen.
Warm-up Test
Following
TCL standard and practices, it’s required minimum 15min of Warm-Up that
can be considered as Burn-In.
Additional Aging for White Balance alignment is no more necessary due to
consistent Picture Performance with Cloning usage.
First you need to enable Factory Key. After that selecting“ Factory menu >WARM UP”, pressing RCU “OK ►”
key and then leaving Factory menu by pressing “Exit” key. To release/disable Burn-in mode, it’s just required to
press “Menu” button from local
keyboard. Other faster methods via UART/IR commands are available on enclosed
SIACP
requirements (rev. v8.31)
White Balance & Automatic Gamma correction
For
the white balance & automatic gamma correction, we only need do one of them
based on the value of
Align-mode in PDM system or the method gave by AOE or R&D.
The detail instruction of Align-mode is as below table:
Align mode WB alignment of Auto
gamma correction 0 > WG
alignment
1 > Gamma correction
White Balance alignment (Golden sample)
As
some color coordinates discrepancies can be noticed from panel batches to
others, it may necessary to perform slight touch-up.
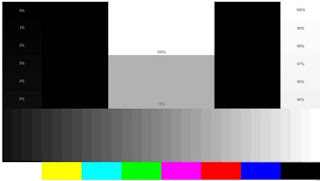
For Color temperature adjustment, switch TV on leading HDMI input where should be connected suitable generator providing
following format 1280x720p@60Hz test
pattern. A 32 steps grey scale is recommended to assess relevant colorimetry
tracking and low or high light saturation points.
Ensure that TV’s picture
enhance is off.
Ensure that TV is in Factory mode to access to” White Balance” adjustment submenu.
WB Normal is the first mode which is adjusted in HDMI source, the next are
HDMI warm and cool mode.
Warm and Cool Tone are relatives to Normal
mode. WB adjust need to fix default G Gain .Offset registers needn’t to
be adjusted.
“Gain” registers set need to be
adjusted at 70IRE.
Note: The operation must enable
factory “P” mode
Auutomatic Gamma correction
Gamma
correction, or often simply gamma, is the name of a nonlinear operation used to
encode and decode luminance or tristimulus values in video or still image
systems.
You need adjust 4+3 gamma for different samples based on the color coordinates
and target gamma offered by PQ engineer. So each sample can get almost the same
effect as PQ golden sample. The 4+3 gamma include 4 gamma based on 4 different
color temperature (cool, normal, warm1, warm2) and 3 gamma related to SDR to
HDR (cool, normal, warm).
For the automatic gamma correction, we can do as below, but please refer to “Gamma correction specification (v1.00)”for
detail.
* Initialize the picture, turn off dynamic backlight, dynamic contrast, and set
picture mode as computer desktop mode;
* Get the color coordinates (x, y, Y) and target gamma in the PDM of the target
model;
* Open the factory menu of TV, Open the tools SIACP and main.vi on
the PC, connect the equipment correctly (CA310, serial port, PC, TV);
* Fill the color coordinates (x, y, Y) target gamma, error range and time-delay
in the main.vi tool that made by AOE, and save it;
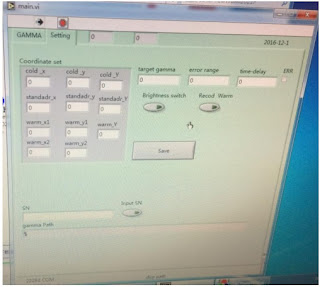
Put the probe on the
middle of the panel, and then run main.vi.
The 4+3 gamma will be created and calibrated automatically and saved in
the TV.
As 4+3 gamma is a new and good way for
PQ especially for HDR, we need adjust it in the factory now. And if we do the
4+3 gamma, there is no need to adjust the white balance. But we need do the
initial setup of white balance.
“How to do initial setup of white balance”
Note: The operation must enable factory “P” mode
Targets and Tolerances for all inputs
(According to company uniform LED color temperature standard of panel)
The
measured and adjustable parameters should be mainly “x”, “y”
coordinates.
The White Balance alignment and Automatic Gamma correction should be performed
using a well calibrated and contact less analyzer (ex: Minolta CA210 or CA310).
The analyzer may not touch the screen surface, and measurement must be
performed in a dark environment keeping the probe(s) at 90+/-2° from the panel centre.
The results should fulfil specification for each TV set offered by R&D and
below tolerances:
For
the 4+3 gamma the target value is 2.2 and error range is ± 0.05.
Note:We will add more project ID later.
Note: If we can do both of White
Balance & Automatic Gamma correction. For some special models, please
notice the information provided by Huizhou factory or PJM to choose which way
to make it.
Cloning
Once
a TV is well aligned and prepared (channels maps, volume, picture presets, …) ,
user can prepare golden clone image that can be copied on demand to all further
TV production lot of same TV. To access cloning function, you can select “Factory menu USB Clone >All -Chanel List - EEPROM - Users Setting” , Scroll down to “TV to USB” or “USB to TV” and press RCU “OK ►”
key to process. 4 BIN images can created, overwritten or read on USB stick (pen
drive) depending on chosen template like following: “database-applications-database-***.db” . These files need to be used
strictly with MT58SoC platform as depending on SW structure.
Other faster access methods via UART/IR command share available on enclosed
SIACP requirements (rev. v8.31).
Note: This function is only useful on factory
sita P mode. And in hotel mode, we can use it too, but only copy the information
related to the hotel.
High Pot. and Insulating Resistance
Tests
At the end of the
process, a “High Voltage” and an “Insulating Resistance” tests are required to fulfil
Safety
Electrical requirements (CEI 65065).
High Voltage Withstanding requirements --Insulating Resistance requirements
“Voltage”
> 3500VAC - “Voltage” > 500VDC
“Max Leakage Current” > 10 mA
- “Threshold Min” >4M Ω
“Test Time” >3 sec -
“Test Time” >2 sec
At final process stage,
it’s necessary to perform “Reset shop”
before any packing to leave Factory mode and restore User default presets.
First you need to enable Factory Key. After that selecting “Factory menu àReset Shop”, then pressing RCU “OK ►”
key. Other faster methods via UART-IR commands are available on enclosed SIACP
requirements (rev. v8.31).
Note:A password might be required in case of
Parental Control function is locked, use default “1234” password or “0423” super password to
clean-up existing ones if forgotten.
“How to upgrade main SW using tool”
Upgrade RT2841 main SW by using RTK tool
Download
boot bin “dvrboot.rescue.exe.bin.bin” &main software “Update.img” from the
software route.
Connect UART interface to suitable manufacturing TV input connector, upgrade
boot bin first to blank IC.
1) Turn off your TV, and then connect the Serial Interface to USB debug port.
2) Open the rtice software, select the Burn page, click the icon, and enter the
boot burn page as shown below

3) Click the settings
icon, open the settings page, and configure it as shown below

Connect Type select RS232;
Comm port selects the corresponding serial port;
Set-Status type option ROM Code;
IC Type Selection Macarthur5;
Then click ok.
4) Configure Burn parameters and select bootcode load path, as shown below.

5) Click the Start button
to enter the boot state and the state will change to the connect state as shown
above.
6) Then power on the TV.
After the connection is successful, the TV enters the upgrade state and waits
for the upgrade to complete. After the upgrade is complete, the following
figure shows the bootcode successfully burned.

Then Upgrade Main SW ,
Copy Main SW “Update.img” into USB stick (pen drive) root path,
>
Insert USB to TV USB port, long press the “MENU-STB” button of local keyboard ,
and then Power on TV by AC, The light of IR will flicker, it means TV is
updating SW.
> After finish update SW, TV will reboot automatically and please remove the
USB.
“How to upgrade SW using USB”
Upgrade RT2841 main SW
* Copy
the “Update.img” into USB stick
(pen drive) root path.
* Please delete other xxx.img files from USB stick.
* Plug USB stick to the TV.
* Power on TV by AC, at the same time press “power on” key for 10s, TV will
update SW automatically.
* When reflashing is successful, TV should restart automatically (about 4min).
Note:If “upgrade” was performed, a “Welcome
Setup” menu should be displayed, otherwise new SW version should be displayed
into relevant Factory mode caption info or on bottom of “Factory menu“
If the P mode is reflashing after upgrade and can not be closed, go to “Factory menu” and select ‘Sita P mode’
to ON, restart TV. Then go to “Factory
menu” again and select ‘Factory hotkey’ to OFF.
“How to upgrade SW using USB and RCU”
“How to upgrade FLASH SW by OAD”( not
support now)
“How to change Project ID with RCU”
Enable Factory Key (See
“section 2.0-Product Assembly”)
* Process following subsequence IR codes to change project ID:
If it works, the TV will
restart automatically.
“How to upgrade CI Key using
USB”
* Enable
Factory Key
* Create the folder named “CIKEY”, change the CI key to “CIKEY-xxx.bin” (xxx is
the number), put CI key into the folder.
* Plus the USB into the TV.
* Go to “Main menuà Service menuà USB Update >CI Key Upgrade “, click the right button.
* If the toast show CI Update OK, it means burn the key success.
After burning, the CI key will movie to the folder CIKEY>BACKUP.
Note: The operation must enable
factory “P” mode
Note: If unfortunately the process failed,
you may need to download new CI key and repeat operation again.
“How to upgrade Widevine Key using USB”
* Enable
Factory Key
* Create the folder named “WIDEVINEKEY”, change the Widevine key to
“WIDEVINE-xxx.bin”(xxx is the number), put Widevine key into the folder.
* Plus the USB into the TV.
* Go to “Main menuà > Service menu > USB Update > Widevine Key Upgrade “, click the right button.
* If the toast show Widevine Update OK, it means burn the key success.
* After burning, the Widevine key will movie to the folder WIDEVINEKEY-BACKUP.
Note: The operation must enable
factory “P” mode
“How to upgrade HDCP key using USB”
HDCP
* Create
the folder named “HDCP”, change the HDCP key to “HDCP-xxx.bin”(xxx is the
number), put HDCP key into the folder.
* Enable Factory Key
* Plus the USB into the TV.
* Go to “Main menu > Service menu > USB Update >[HDCP] Upgrade“, click the right button.
* If the toast shows HDCP Update OK, it means burn the key success.
After burning, the HDCP
key will movie to the folder HDCP-BACKUP
“How to upgrade MAC Address using USB”
* Create
the folder named “MAC”, change the MAC key to “MAC-xxx.bin”(xxx is the number),
put MAC key into the folder.
* Enable Factory Key
* Plus the USB into the TV.
* Go to “Main menu>Service menu> USB Update > MAC
Upgrade“, click the right button.
* If the toast show MAC Update OK, it means burn the key success.
* After burning, the MAC key will movie to the folder MAC-BACKUP.
Note: There is no this function which is only displaying.
“Network Connection Setup”
Note:You
can set up your TV so that it can access the Internet through your local area
network (LAN) using a wired or wireless connection.
Wired Network Connection
You
can connect your TV to your LAN using cable in three ways:
1) Plug your TV to your LAN by connecting the LAN port on your TV to an
external modem using a Cat5 cable.
2) Plug your TV to your LAN by connecting the LAN port on your TV to an IP
Sharer which is connected to an external modem. Use Cat5 cable for the
connection
3) Depending on how your network is configured, you may be able to plug your TV
to your LAN by connecting the LAN port on your TV directly to a network wall
outlet using a Cat5 cable (Note that the wall outlet is attached to a modem or
router elsewhere in your house)
4) Select “Menu >Network Settings>Ethernet” to check if the network has connected. If not then select “IP settings” to connect to network.
Wireless Network Connection
To
connect your TV to your wireless network, you need a wireless router or modem
and a Wireless LAN Adapter.
* Select “Menu > Network Settings > Wi-Fi-On”, then it will appear the valid wireless networks near your area.
* Select available access point and press “OK ►” to connect the TV to it.
Note: If you select a protected access point,
you will have to enter the corresponding password. Press “OK” on the remote control
to display virtual keyboard to enable you to enter the password.
Network
Setup
* Connect
your TV and the available network with the network cable first.
Press
If connected, the Internet
connection will display Connected. If not, If not it will display “Not
Connected” and you can try to enter your IP address manually to connect the
network follow below steps
* Select “Advanced options”>“IP Settings”>“Static” by pressing “OK ►” key
* Enter the “IP address”, “Gateway”, “Network prefix length”, “DNS1”and
“DNS2”values. Use remote control
digital keys to enter number sand “◄/►” key to move from one to other field
location
* After setting all required inputs and save successful, to check the Internet
connectivity again
* Select
“How to do initial setup of white balance”
Firstly,
you need to enable Factory Key:
* Press RCU “MENU” key to display main menu
* Select “Settings →Picture → Advanced setting → Contrast”, Scroll down to
“Contrast” item
* Press the subsequence RCU keys “9”, “7”, “3” and “5”
* Select “9-Sita P mode”, Press RCU “◄/►” key change the values to ON
* Reboot TV
* 'Factory Hotkey' will be ON automatic.
Secondly, press RCU Option, Select Picture → Advanced setting → Contrast → Press RCU “1950” enterdesign main menu → Reset all
No comments:
Post a Comment