Always respect voltages. While some
may not be dangerous in themselves, they can cause unexpected reactions that
are best avoided. Before reaching into a powered TV set, it is best to test the
high voltage insulation. It is easy to do, and is a good service precaution.
The melting temperature of
lead-free solder is higher than that of leaded solder by 30ºC to 40ºC (54ºF to
72ºF). Use of a soldering iron designed for lead-based solders to repair product
made with lead-free solder may result in damage to the component and or PCB being
soldered. Great care should be made to ensure high-quality soldering when
servicing this product especially when soldering large components, through-hole
pins, and on PCBs as the level of heat required to melt lead-free solder is
high.
Depending on the model,
use an isolation transformer or wear suitable gloves when servicing with the
power on, and disconnect the power plug to avoid electrical shock when
replacing parts. In some cases, alternating current is also impressed in the chassis,
so electrical shock is possible if the chassis is contacted with the power on.

How to enter and Exit from the SERVICE MODE
* Press
MUTE button once on Remote Control.
TV
mode changes as follows. Un-Mute => Mute
* Press
MUTE button again and keep pressing. (Sound Mute is cancelled)
* While pressing the MUTE button, press P Up button on TV control panel.
This is the
way to enter the service mode. Letter 'S' will appear at top right corner of the
screen indicating that the set is in Service Mode. See the service mode screen below.

KEY FUNCTION IN THE SERVICE MODE and Test Signal Selection.
The following key entry
during display of adjustment menu provides special functions.

SELECTING THE ADJUSTING ITEMS
While displaying the
adjustment menu, press the P UP button to cycle through the adjustment items in
the order of table. (P DN button for reverse order)
ADJUSTING THE DATA
While displaying the
adjustment menu, press the VOLUME + OR – button to change the value of data in the
range from 00H to FFH. The variable range depends on the adjusting item.
HOW TO EXIT FROM SERVICE MODE
Press the [Exit] button on
Remote.
ADJUSTING ITEMS IN THE SERVICE MODE

LED INDICATIONS FOR SERVICE - Software
Upgrade and Error conditions indicated by the Power LED is described below.

How to ENTER the HOTEL MODE MENU
1) Open Main Menu by pressing
Menu button of RCU.
2) Press the following password number “1048” with the button of Remote
Control.
Note: Hotel Menu can be displayed to input the password number when there is
focus in the first layer of Main Menu.
DISPLAY OF HOTEL MODE MENU
The Graphic Design and
color of Hotel Mode Menu is the same as the User menu.
(Small differences which do not affect to operation will be acceptable)
- The language will follow the “Menu Language” setting in the menu.

OPERATING HOTEL MODE MENU
To enable Hotel Mode,
press ▲or DN buttons to select “Hotel Mode” item and press u button.
Press ▲or DN buttons to select “ON” and press OK button.
- Once Hotel Mode is “On”, the Hotel Mode settings will be enabled for
adjusting.
- Press ▲or▼ buttons to select item of Hotel Mode Settings.
Press u and ▲or▼ buttons to
select settings and press OK button.
See the table below for explanation of each setting.
Press Exit when finished
adjusting the settings.
USB CLONE FUNCTION
Feature
overview
Hotel
Menu settings and Welcome Screen image, Picture settings, Default URL of
Toshiba Cloud TV.
Services and Network settings should be copied to other TV by Hotel Menu “USB
Clone Function”.
Welcome Screen image
・ File name:
WelcomeScreen.jpg (case sensitive)
・ File type: JPEG
・ Color depth: 24bpp
・ Resolution: 1280 x 720
・ File size: 1MB or less
Note: The Welcome image is preserved besides the TOSHIBA logo (default). When
user would like to copy Welcome Screen, the clone data should be exported to
USB memory in advance and then put the Welcome Screen image into USB and start
import Clone data from USB to TV.
< Default URL of Toshiba Cloud TV Services >
・ File name:
hotelCloudConfig.txt (case sensitive)
*However, URL can be operated on the site specially developed.
・ File type: Text
Note: When user would like to copy “URL of Toshiba Cloud TV Services”, the
clone data should be exported to USB memory in advance and then put
“hotelCloudConfig.txt” file into USB and start import Clone data from USB to
TV.
Copying data form TV to USB
Press “OK” on “Start USB
Clone” button of “USB Clone Function”, USB Clone mode initial window [1-1] is
displayed.
The options below are selected by left and right keys in this window.
USB to TV Copy setting data in USB
memory to TV.
TV to USB Copy TV settings to USB
memory.
(2) Insert USB memory, select “TV to USB” [1-2] and press [OK] key.
(3) The now copying window [1-3] will be displayed.
(4) Wait for window that indicates the copying process is complete before
removing the USB drive.

To write data form USB to TV
(1)
Press “OK” on “Start USB Clone” button of “USB Clone Function”, USB Clone mode
initial window [2-1] is displayed.
(2) Insert USB memory, select USB to TV [2-1], and press [OK] key.
(3) The window [2-3] will be displayed.
(4) When the copying has finished successfully, the message "The TV will
reboot when this window is closed." will be displayed. If the copying is
not successful, an error message will be displayed.
(5) Exit the menu and the TV will reboot.
(6) Remove the USB memory.

MAIN BOARD EXCHANGE
When
Main board is exchanged, the Application SW (Firmware) and Model Setting need
to be updated and the serial number needs to be written the serial number into
Main Board (see “WRITING SERIAL NUMBER INTO MAIN BOARD”).
Please update in the following procedures.
Updating of Software and Model Setting
Copy
the Application SW (Firmware) file and the Model Setting file to the root of
the USB mass storage device.
Note
: Use the USB mass storage device formatted with “FAT32”

Unplug
TV, and then insert the USB mass storage device to the USB slot of the TV.
Note
: Please unplug TV after turning ON TV by "Power" key on remote
control.
3. During pressing “-” key of side key
on TV, plug TV.
Note : Please continue pressing "-" key until "Software
upgrade in progress." appears on a screen.
After
updating complete, unplug TV and remove the USB mass storage device.
Plug
TV, then check the updating by using self check screen.
Refer
to “Confirmation of Software updating” section on next page.
6. Update to the newest SW.
This model can be updated from aerial or network to the newest Software.
Refer to the user manual of this model for the updating method.
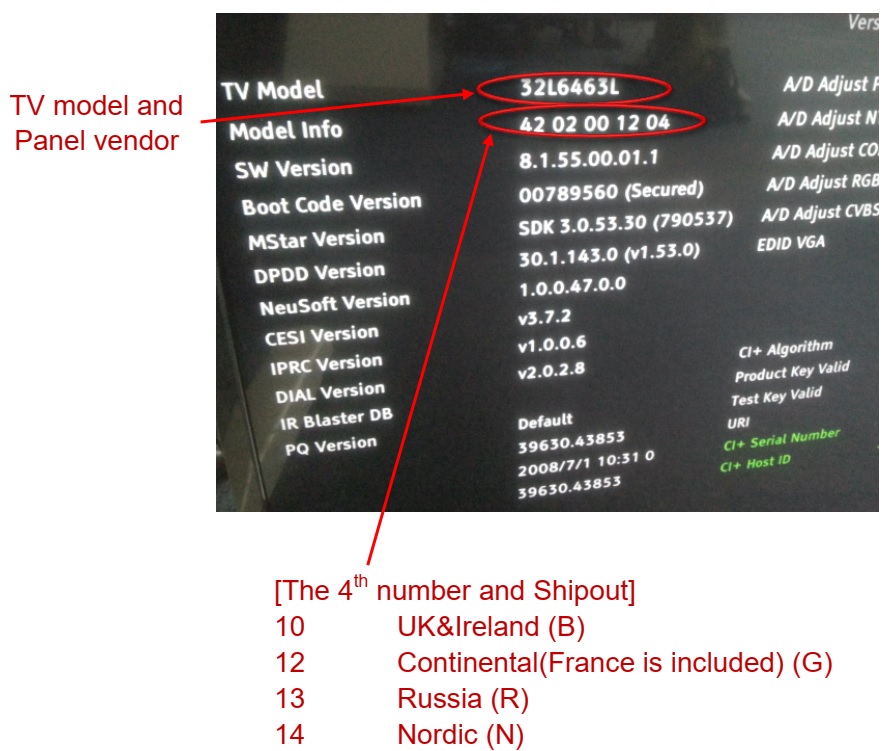
Confirmation of Software updating
Check the TV Model and
Model Info by using self check screen.
1. Press SETUP on Remote Control.
2. Select “Get Help” >> “System Information”
3. Press “3” “5” “7” “4”
Self
check screen is displayed.

WRITING SERIAL NUMBER INTO MAIN BOARD
When
the board is broken, service man will go to customers home and change the
board. After change the board service man has to put the serial number same as
before. So the service man will use the PC and write the serial number to USB
mass storage device. After that the service man will plug the USB mass storage
device to the TV and write the serial number to the TV.
Create the ini file by Text Editor.
File
Name: Service Serial Number Writing.ini
File Format: Plain Text.
Write two lines, "[serial number]" and a serial number, using the
text editor on Windows.
For example, when a serial number is "C37222T00008L1":
[serial number]: C37222T00008L1
2. Use the USB mass storage device
formatted with “FAT32”.
3. Copy the "ServiceSerialNumberWriting.ini" file to the root
directory of the USB mass storage device.
Enter Service mode.
1.
Press the MUTE button once on Remote Control.
TV mode changes as follows. Un-Mute => Mute
2. Press the MUTE button again and keep pressing.
3. While pressing the MUTE button, press P UP button on TV
control panel.
5. Insert the USB mass storage device
to the USB slot of the TV set. Writing
starts.
After
finish writing the “OK” and “Serial number” appear on TV.
Unplug
USB mass storage device.
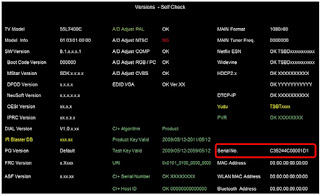
8. Check the serial number by using self check screen.
How
to enter the self check screen.
1 Press SETUP on remote control unit.
2 Select “Get Help” >> “System Information”
3 Press “3” “5” “7” “4”
No comments:
Post a Comment