Applicable to: TCL49U7800, TCL50P6, TCL55P6, TCL65P6, TCL50P65, TCL
55P65, TCL65P65
How to access factory menu.
Whenever you request access to the Factory menu, you must perform the
following procedure:
-
Turn on the device;
-
On the remote control, press the MENU key (key);
-
Select Advanced Settings;
-
Select IMAGE menu;
-
Select the CONTRAST option;
-
On the remote control, press the number sequence 9735;
- The factory menu will be available.
With the TV on enter the Factory menu. In it, verify that the installed software version is correct.


Main SW update via the User Menu.
- Download the compressed file update.zip, change the name and extension to “V8-S586T03 -LF1VXXX.bin ”where XXX is the version number.
Save
the file to the root of a USB device.
-
Connect the USB device, with the software, to the USB port.
-
Select MENU (Key) Update Support. via USB.
-
The device will find the Vxxx software. Press "Update".
The
update will start. After approximately 4 minutes the TV will automatically
restart.
-
After restarted, perform the reset by going to the settings menu “MENU (key)
Restart the TV.
Confirmation and password request is requested. Enter 1234 and press
"OK".
-
After this the TV will restart.
Note:
The version of the Software to be used must be the one informed in the material
plan of the respective product.
Save
the file to the root of a USB device by renaming it “update.zip”.
-
With the device disconnected from the mains, connect the USB device with the installation
software, on the USB port.
-
Pressing the TV's Power key and keeping it pressed, connect the TV to the mains
-
The update will start. After approximately 4 minutes the TV will restart automatically.
-
After restarting, perform the reset by going to the settings menu “MENU (key)
Support
Restart
the TV. Confirmation and password request is requested. Enter 1234 and press
"OK".
-
After this the TV will restart.

PROJECT ID CHANGE
(If
panel information is wrong)
If
the screen is completely dark due to the difference in panel x installed
software, press 062598 + MENU + xxx (xxx: Panel ID)
For
the correct identification of the product, observe the beginning of its serial
number.
With
this, you can insert the correct values on the plate and restore the product to
function.

New
panels may be introduced in the future and if the model is one of those listed
above but the serial number does not start with any of these informed, obtain
the Panel ID from SEMP TCL suitable for the product.
After
the update, the TV will enter TV mode and the channel that was previously
selected.
Enter
the factory menu again, select option 3 - Reset Shop, press enter.
After
the reset, switch on the device using the power key.
Panel test mode (warm -up)
Recommended
for analysis of panels (spots, dots, scratches, etc.).
Enter
the Service Menu as indicated before, turn on the option “Factory hotkey” and
turn on the “WARM -UP” function.

A
sequence of screens in different colours will be generated where it can be
verified with more details, possible panel failures.

In
the same “WARM - UP” mode, a table with the main product information will be displayed
in the lower right corner.

In
this table we have the project information:
We
have the project ID, as shown in the table above and following the version of
the software in use.
Below
the information of the recorded keys (MID):
MAC
(Mac Address) Without recording this key, it is not possible to connect to the internet
via ethernet (LAN);
DID
(Device ID) Product Factory Control; Already included in the main software.
ESN
(Netflix) Without recording this key, you will not be able to access Netflix
services;
HDCP
Without recording this key, high definition images from the HDMI inputs will
not be reproduced;
HDCP2.0
Without recording this key, 4K images will not be reproduced;
WIDEVINE
Without recording this key, content from YOUTUBE and other sites will not be played.
The last key marked “NULL” in this project refers to the requirements of the European broadcasts (DVB digital format) that are not required in Brazil. Ignore this key.
IMPORTANT NOTE: If some of the other keys are not recorded, the “NULL” information to replace the respective key on that line.
In
this case, SEMP TCL support should be contacted for instructions from recording
procedures.
To
EXIT the “WARM - UP” mode, press the POWER key on the device because the
functions remote control will be disabled and if the device is just
disconnected from the network, the “WARM - UP” mode will return when the
network is connected again.
After
exiting WARM - UP, enter the factory menu again and turn off the option
Factory
Hotkey or give a user reset.
Tension
table and software update

Block diagram

PSU Connector (12V) schematic.

12volt to 5volt schematic

12volt to 3V3 volt

12volt to 1.5volt [CPU power]

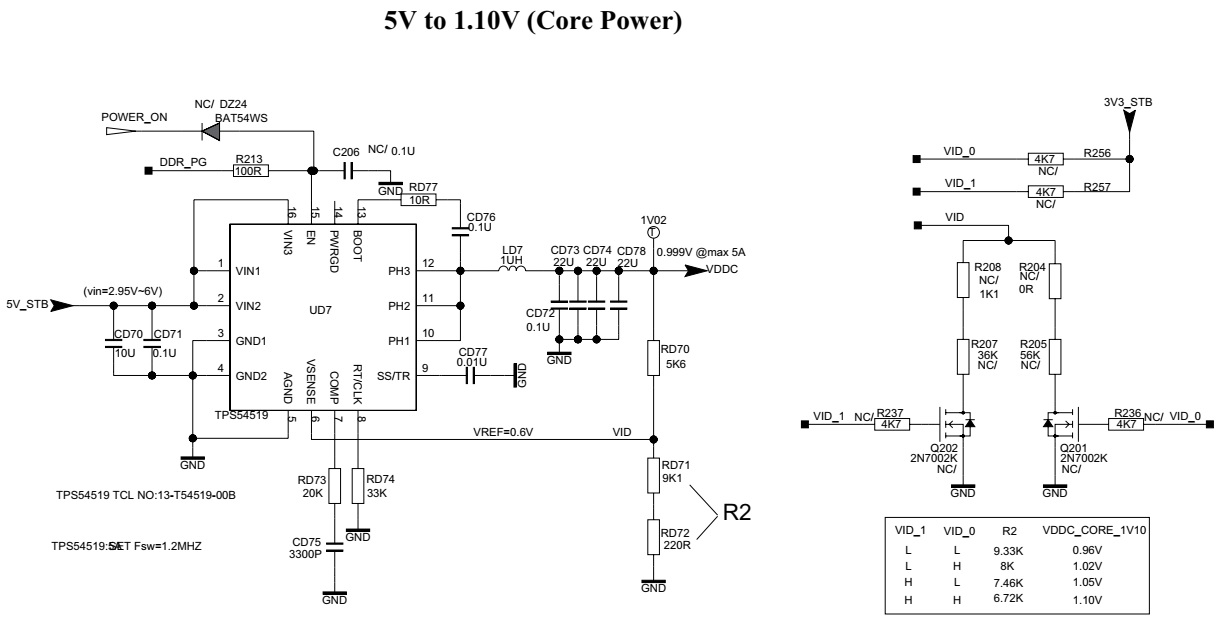
5volt to 1.1volt [core power]
Audio amplifier circuit

Audio amplifier circuit [AD82587D]

49U7800 power schematic


50P6US power schematic


55P6US power schematic


65P6US power schematic


50P65US & 55P65US power schematic


65P65US power schematic


REMOTE CONTROL CT8518 - RC802N

No comments:
Post a Comment