Nextbook NX008HD8G Screen Replacement
Use this guide to replace a broken screen. Sliding the plastic opening tool between the back panel and the front glass can be difficult. This guide is relatively simple, mainly unscrewingand disconnecting a ribbon connector.
Using your finger, open the plastic tab to the right of the rear-facing camera.
Wedge your fingernail in between the back panel and the plastic tab and pull the plastic tab towards your body.

Using your
finger, remove the SD card by pressing down on top of it (toward the bottom of the
device) until you hear a clicking sound.
Once the card pops out, use your finger to pull the card completely out of the SD card slot.
Once the card pops out, use your finger to pull the card completely out of the SD card slot.
Remove the 5
mm screw using the Phillips PH00 bit metal Screwdriver.


Use the plastic opening tool to separate the back panel by carefully sliding the narrow end of the tool between the front glass and back panel.
Use a second plastic opening tool to help pry the front glass from the back panel.
You will hear some cracking sounds when separating the front glass from the back panel.
That is okay! That is the back panel latches releasing the front glass.

Use your hands to completely separate the rest of the front glass from the back panel.
Do not to pull the device apart with too much force. If you do, you may break or bend the back panel.

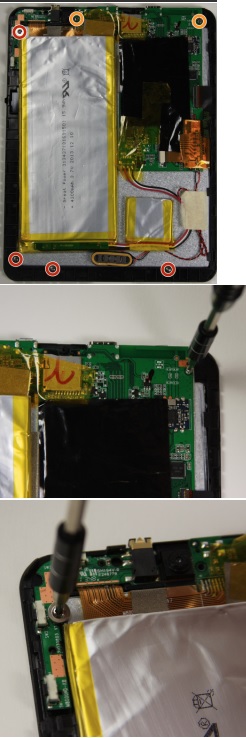
Using the
Phillips #0 bit screwdriver, remove the four 5 mm screws with
the washers around them connecting the digitizer to the screen.
Using the Phillips #0 bit screwdriver, remove the two 5 mm screws connecting the motherboard to the back of the digitizer.
Using the Phillips #0 bit screwdriver, remove the two 5 mm screws connecting the motherboard to the back of the digitizer.
Using the
flat end of the plastic spudger, open the black ribbon connector door on the
right side of the motherboard.
Pull the ribbon out of the ribbon connector using your finger.
Pull the ribbon out of the ribbon connector using your finger.


To separate the digitizer from the screen, tilt the device on its right side and use your other
hand to pull the battery to the right.
If you tilt the device too far the digitizer may fall out.
The upper left corner of the motherboard may be harder to disconnect from the screen.
To reassemble your device, follow these instructions in reverse order.