Sony RDR-HXD790/HXD795, RDR-HXD890/HXD895, RDR-HXD990/HXD995/HXD1090, HXD1095
Remote control: RMT- D251O, D251P
Australian Model
RDR-HXD890, HXD990
DISK
REMOVAL PROCEDURE IF THE TRAY CANNOT BE EJECTED (FORCED EJECTION)
1. Remove the upper case.
2. Insert the stiff wire in the hole and eject the tray.
1. Remove the upper case.
2. Insert the stiff wire in the hole and eject the tray.
NOTES
DURING THE FORCED EJECTION
1. If the forced ejection is executed while a blank disc media (DVD±RW, ±R) exists on the tray
* Insert a DVD-ROM (DVD test disc, DVD software available on the market, or the like) in the tray and then close the tray.
Note1: If you close the tray while it is empty, ejection of the tray becomes impossible.
Note2: If you close the tray with a CD disc inserted in it, the CD can be ejected.
However, if you close the tray while it is empty, there can be a case
that ejection of the tray becomes impossible.
Note3: Even if you replace the DVD drive unit while the tray remains under the state as described above, the situation cannot be improved.
2. If the tray cannot be ejected while the disc is not inserted
* Execute the forced ejection.
* Insert a DVD-ROM (DVD test disc, DVD software available on the market, or the like) on the tray and try to close the tray.
(There are cases that it recovers
the trouble.)
3. Contents of forcefully ejected blank disc media (DVD±RW, ±R) can be damaged.
(There can be a case that initialization is also impossible.)


MODEL NAME SETTING METHOD WHEN ENGINE IS REPLACED
Required equipment:
* Remote controller (RMT-D251O/D251P)
* Service remote controller (Part code: J-6090-203-A)
* Monitor.
Model name delete method.
A special remote control (Service remote control) needed to proceed. Can be purchased from the authorized service center for Sony.
1. Turn the main POWER ON.
2. Press the following buttons on the service remote controller in this order.: “ESC” > “CHAP” > “1”
* Confirm that the above operation is performed in the state that the screen has exited all settings such as “Home Menu” or “Simple Setting”.
3. Turn the main POWER OFF.
4. Turn the main POWER ON.
5. Find out the tentative model name from the Correspondence Table for the client machine. Then, enter the 4-digit “Input No.” on the screen using the service remote controller.
6. The model name setting method is complete. (Screen disappears.)
* Upon completion of the model name setting, be sure to press both “ENTER” and “3” simultaneously on the service remote controller without fail.
It sets the remote control code “3”.
Symptom: If the following operation is performed, set won’t be able to be restored.
Remedy: Must not be performed the following operation using service remote.
If it is performed, set won’t be able to be restored.
And if set is broken by the operation, we can’t guarantee the set when pressing in order of the following button.
* [ESC] > [STEREO]
([ESC] > [Any button which is not described in SM])

HOW TO DIAGNOSE HDD FAILURE
Defective HDD
There are four symptoms of defects in the HDD.
1. “E01” is displayed on the FLD. (The HDD is unauthorized.)
2. “E02” is displayed on the FLD.
3. When playing a video, MP3, or JPG, contents freeze.
4. Irregular noises from the HDD
HDD Recognition status
How to enter Recognition status and sub screen mode.
• While the GUI screen is not displayed, use the service remote controller and press “ESC” key followed by “DISP” key.
• While the first screen is displayed, press “DIG/ANA” key repeatedly until the desired sub screen is displayed.
The sub screens change.

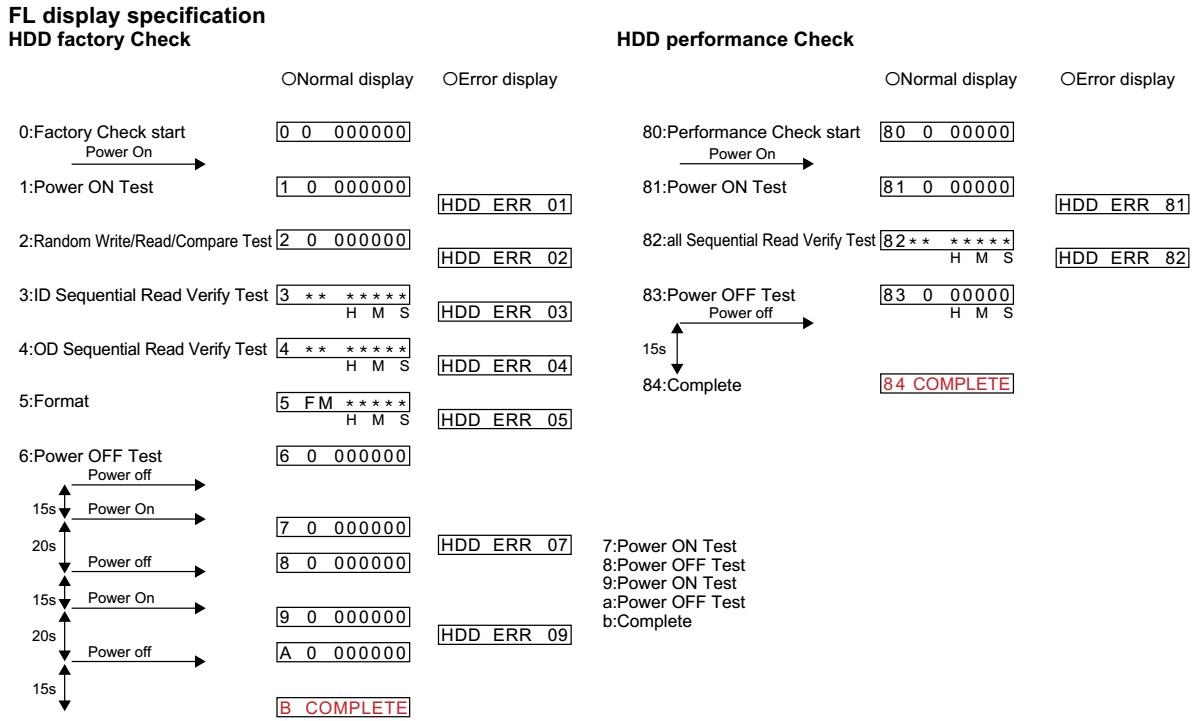
Factory Check
1. Pull out and then reconnect the AC cable.
2. Press “ESC” key followed by “P.RUN” key to start Formatting.
3. When “B COMPLETE” appears, the Factory Check is complete.
4. Press “Power” button. The unit starts normally.
When “Factory Check” has finished completely without error , reset “Recording Error History” and “A TA/ATAPI History Error” with the Clear key
Note: Write down the HDD information on the HDD return sheet before replacing the HDD.
SERVICE MODE
When performing “Factory Check”, the data saved to the HDD by the customer is erased.
Obtain customer consent before performing “Factory Check”.
“Recording Error History” and “ATA/ATAPI History Error”,
Final Check
SELF TEST (SMART TEST)
This is a simplified diagnosis for the HDD.
A serious failure in the HDD can be detected with this test.
Time required for testing: Approx. 60 sec.
How to start/terminate the diagnostic program
Use the remote control unit for servicing.
• How to start: Press the following keys in this order; “ESC”, “CX”, “0”, and “1” keys.
• How to terminate: Press “ESC” key.

Execute
Self-Test.
•
Press “3” key on the remote control unit for servicing while the menu screen is
displayed.
• When the following screen is displayed, press “1” key to start the Self-Test.
• When the following screen is displayed, press “1” key to start the Self-Test.

Diagnosis results
* Without an error: “. . . Completed” is displayed. Then, proceed to the Extended Self-Test.
* With an error: “. . . Error” is displayed. Look at the number in Test Result.
If the place value for tens is 1 or 2, execute the Self-Test again.
If it is from 3 to 7, the HDD must be replaced.
Note: If the result of the second test is the same, replacement of the HDD is required.

Performance Check
Press “ESC” key, then “A.MON” key.
This is a reading test across all sectors of the HDD.
Data recorded on the HDD will not be erased, because no writing operation is performed.
Time required for testing: Approx. 45 min/160 G 75 min/250 G 130 to 150 min/500 G
When “Performance Check” finishes completely without error, reset “ATA/ATAPI History Error” with the Clear key.
FL Display Flow
* The logo for “Factory Check” and “Performance Check” is recorded in “ATA/ATAPI History Error”
Notice
of traverse mecha (TM) exchange.
For
TM exchange, refer to SM below.
Service manual:RW6G/7G TRAVERSE MECHANISM REPAIR MANUAL(9-885-951-1*)
How to get it: 1.Open Service manual home page of ESI.
2.Input RW6G into ”Model Name”.
3.Click “Search” button.
Service manual:RW6G/7G TRAVERSE MECHANISM REPAIR MANUAL(9-885-951-1*)
How to get it: 1.Open Service manual home page of ESI.
2.Input RW6G into ”Model Name”.
3.Click “Search” button.

SMPS schematic

Click on the pictures to zoom in