Service
Adjustments _ Error Codes_Service Mode _ Sony HBDTZ210 _ Sony HBDTZ230 _ Sony HBDTZ510
_ Sony HBDTZ630_ Sony HBDTZ710
 How to open the disc table when power switch turns off
Insert a tapering driver into the aperture of the unit bottom, and slide it in
the direction of the arrow.
Insert a screwdriver from between the front panel and the
chassis and slide the rod in the direction of the arrow.

DISC TRAY LOCK
The disc tray lock function for the antitheft of an
demonstration disc in the store is equipped.
Press the [Power] button to turn the set on.
Press the [FUNCTION] button to set DVD/CD function.
Press the [FUNCTION] button to set DVD/CD function.
Insert a disc.
Press the [stop] button and the [eject] button simultaneously for five seconds.
Press the [stop] button and the [eject] button simultaneously for five seconds.
The message “LOCKED” is displayed and the tray is locked.
Releasing Procedure
Releasing Procedure
Press the [stop] button and the [eject] button simultaneously
for five seconds again.
The message “UNLOCKED” is displayed and the tray is unlocked.
Cold Reset
The cold reset clears all data including preset data stored in the RAM to initial conditions. Execute this mode when returning the set to the customers.
The cold reset clears all data including preset data stored in the RAM to initial conditions. Execute this mode when returning the set to the customers.
Press the [power] button to turn the power on
Press three buttons [play], [FUNCTION] and [power]
simultaneously.
When this button is operated, display as “COLD RESET” for a
while and all of the settings are reset.
Panel Test Mode
This mode is used to check the software version, FL and KEY.
This mode is used to check the software version, FL and KEY.
Display Test Mode
Press the [power] button to turn the power on
While pressing the [stop] and the [play] buttons simultaneously,
turn the [VOLUME] control in the direction of (+).
When the display test mode is activated, all segments are turned
on.
To exit from this mode, while pressing the [stop] and the [play]
buttons simultaneously, turn the [VOLUME] control in the direction of (+).
Version Test Mode
When the display test mode is activated, press the [FUNCTION]
button and the message “KZ2” (TZ210/TZ230), “KZ4L” (TZ510), “KZ5” (TZ630),
“KZ8L” (TZ710) are displayed, the version test mode is activated.
Whenever the [FUNCTION] button is pressed, the display changes
in the following order.
“KZ2” (Model name) t “NA*1” (Destination) t MC Version
[1: NA changes depending
on destination]
Press the [REC TO USB] button when the MC version is on display.
The date of software production is displayed.
Press the [REC TO USB] button again and the version is
displayed.
To exit from this mode, while pressing the [stop] and the [play]
buttons simultaneously, turn the [VOLUME] control in the direction of (+).
FL Pattern Test Mode
When the display test mode is activated, press the [eject]
button, to select the FL pattern test mode. When the FL pattern test mode, half
segments of FL display.
Press the [eject] button, half segments of FL display.
Next press the [eject] button, all segments of FL display is
turn on
To exit from this mode, while pressing the [stop] and the [play]
buttons simultaneously, turn the [VOLUME] control in the direction of (+).
Key Test Mode
When the display test mode is activated, press the [power]
button, to select the key test mode.
To enter the KEY test mode, the fluorescent indicator displays “K0
V0”. Each time an another button is pressed, “KEY” value increases. However,
once a button is pressed, it is no longer taken into account. When all keys are
pressed correctly, “K6 V0” is displayed.
When the [VOLUME] control is turned in the direction of (+),
“V0” is changed to “V1”, then ... “V9”. When the [VOLUME] control is turned in the direction of (–), “V0” is changed to “V9”, then ... “V1”.
“V0” is changed to “V1”, then ... “V9”. When the [VOLUME] control is turned in the direction of (–), “V0” is changed to “V9”, then ... “V1”.
To exit from this mode, while pressing the [stop] and the [play]
buttons simultaneously, turn the [VOLUME] control in the direction of (+)
DVD Version Display
Press the [power] button to turn the set on
Press the [play] button and the [power] button simultaneously
for three seconds. SC version display is presented
Pressing the [FUNCTION] button presents a DV version display.
Pressing the [FUNCTION] button again returns to the SC version display
To exit from this mode, press any button other than the
[FUNCTION] button.
Product Out
[This mode moves the optical pick-up to the position durable to
vibration and clears all data including preset data stored in the STR RAM to
initial conditions. Use this mode when returning the set to the customer after
repair.]
Press the [power] button to turn the power on.
Press the [FUNCTION] button to set the function “DVD/CD”
Remove all discs
While pressing the [stop] and the [eject] buttons
simultaneously, turn the [VOLUME] control in the direction of (+).
Displayed to message “SERVICE IN” on the fluorescent indicator
tube when pressing in turn the [4] => [DVD MENU] => [CLEAR] buttons on
the remote commander.
After the “STANDBY” blinking display finishes, the message “MECHA
LOCK” ó “UNPLUG” is displayed on the fluorescent indicator tube
disconnect the AC power plug, then the product out mode is set. The STR RAM initialization is executed upon a
next power-on after the power is turned off.
Color System Change (EXCEPT CND, AEP, UK, E32, CH, RU, AR, MX,
TW models)
Color system change to video signal format (NTSC/PAL).
Color system change to video signal format (NTSC/PAL).
Press the [power] button to turn the set on.
Press the [FUNCTION] button to set the function “DVD/CD”.
Press the [power] button to turn the set OFF.
Press two buttons [FUNCTION] and [power] simultaneously, and the
display of fluorescent indicator tube changes to “COLOR PAL” or “COLOR NTSC”
PROTECTION FACTOR (SD DETECTION/DC DETECTION/TSD DETECTION)
IDENTIFICATION TEST MODE
When an error is detected, the FL tube alternately displays “PROTECTOR”
ó “PUSH POWER”.
Press the [power] button. [Buttons other than the [power] button
are invalid.] (“STANDBY” blinks three times on the FL tube.)
The protection
release state (POWER OFF) is established.
No FL tube display)
Press the [power] button two times.
The power to the system turns on, and the normal operation is established. (Restore)
The power to the system turns on, and the normal operation is established. (Restore)
During the protection state
If the AC plug is connected or disconnected during the
protection state, the protection state is released, and the normal operation is
established. (The protection state is not maintained.)
The protection factor
is displayed by pressing the [RETURN] > [3] > [2] > [0] > [0] >
[ANGLE] buttons of the remote commander.
(During the “PROTECTOR” “PUSH POWER” display)
When SD is detected:
Repeats
“SD DETECT” ó “PROTECTOR”
“SD DETECT” ó “PROTECTOR”
When DC is detected: Repeats
“DC DETECT” ó “PROTECTOR”.
“DC DETECT” ó “PROTECTOR”.
When TSD is detected: Repeats
“TMP DETECT” ó “PROTECTOR”.
“TMP DETECT” ó “PROTECTOR”.
SD detection
When the “L” output from the SD (shutdown) port on the S-MASTER POWER Driver Shutdown and voltage descent (15V or less) of 26V power supply (PVDD) are detected.
When the “L” output from the SD (shutdown) port on the S-MASTER POWER Driver Shutdown and voltage descent (15V or less) of 26V power supply (PVDD) are detected.
DC detection
When the “L” output from the power/speaker error detection circuit (DC detection port) is detected for two seconds continually, the power system other than that of the FL tube is turned off, and the protection state is established.
When the “L” output from the power/speaker error detection circuit (DC detection port) is detected for two seconds continually, the power system other than that of the FL tube is turned off, and the protection state is established.
TSD detection
When the “L” output from the thermal shutdown port (TSDM) on the motor driver is detected.
When the “L” output from the thermal shutdown port (TSDM) on the motor driver is detected.
HOW TO ENTER TEST MODE
While pressing the [stop] and the [eject] buttons
simultaneously, turn the [VOLUME] control in the direction of (+) with the DVD
player in power on. The Test Mode
starts, displayed “SERVICE IN” on this model display then the menu shown below
will be displayed on the TV screen. The display of the “Model Name” of the
“Remocon Diagnosis Menu” change with the model and the destination. Refer to below
on the model name.

The menu above is the Remocon Diagnosis Menu screen which consists
of five main functions. At the bottom of the menu screen, the model name and
IF-con version. To exit from the Test Mode, press the [power] button on the
remote commander.
EXECUTING IOP MEASUREMENT
In order to execute IOP measurement, the following standard procedures must be followed.
In order to execute IOP measurement, the following standard procedures must be followed.
In power on, while pressing the [stop] and the [eject] buttons
simultaneously, turn the [VOLUME] control in the direction of (+).

Select “2". Drive Manual Operation” by pressing the [2] button on the remote commander. The screen will appear as shown.

Select “3". Manual Adjustment” by pressing the [3] button on the
remote commander. The screen will appear as shown.

Select “6". IOP” by pressing the [6] button on the remote
commander.
Wait until a hexadecimal number appear.

Convert each data from hexadecimal to decimal using conversion
table.
Find the label on the rear of the BU (Base Unit). The default
IOP value is written in the label.
Subtract between these two values.
If the remainder is smaller than 93 (decimal), then it is OK. However if the value is higher than 93, then
the BU is defective and need to be change.
Press the [RETURN] button on the remote commander to return back
to previous menu.
Press the [0] button on the remote commander to return to Top Menu.
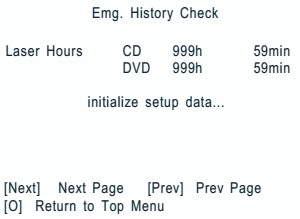
EMERGENCY HISTORY
To check the emergency history, please follow the following
procedure
From the Top Menu of Remocon Diagnosis Menu, select “3. Emergency
History Check” by pressing the [3] button on the remote commander. The
following screen appears on the onscreen display.

You can check the total time when the laser is turned on during playback
of DVD and CD from the above menu. The maximum time, which can be displayed are
999h 59min.
You can check the error code of latest 10 emergency history from
the above menu. To view the previous or next page of emergency history, press [
|<< ] or [ >>| ] button on the remote commander. The error code
consists of the following three blocks. The first block indicates the error
code. The second block indicates the parameter and the third block indicates
the time of error code as shown below.

The meaning of error codes.
01: Communication error (No reply from syscon)
02: Syscon hung up
03: Power OFF request when syscon hung up
19: Thermal shutdown
24: MoveSledHome error
25: Mechanical move error (5 Changer)
26: Mechanical move stack error
30: DC motor adjustment error
31: DPD offset adjustment error
32: TE balance adjustment error
33: TE sensor adjustment error
34: TE loop gain adjustment error
35: FE loop gain adjustment error
36: Bad jitter after adjustment
40: Focus NG
42: Focus layer jump NG
51: Spindle stop error
52: Open kick spindle error
60: Focus on error
61: Seek fail error
62: Read Q data/ID error
70: Lead in data read fail
71: TOC read time out (CD)
80: Can’t buffering
81: Unknown media type
61: Seek fail error
62: Read Q data/ID error
70: Lead in data read fail
71: TOC read time out (CD)
80: Can’t buffering
81: Unknown media type
Clear the Laser Hour
Press [DISPLAY] button and then press [CLEAR] button on the remote
commander. The data for both CD and DVD data are reset.

Clear the Emergency History
Press [DVD TOP MENU] button and then press [CLEAR] button on the remote
commander. The error code for all emergency history would be reset.

Clear the Initialize Setup Data
Press [DVD MENU] button and then press [CLEAR] button on the remote commander.
Return to the Top Menu of
Remocon Diagnosis Menu
Press [0] button on the remote commander
Press [0] button on the remote commander

CHECK VERSION INFORMATION
To check the version information, please follow the following procedure.
(1) From the Top Menu of Remocon Diagnosis Menu, select “4. Version Information” by pressing the [4] button on the remote commander. The following screen appears on the on-screen display.
To check the version information, please follow the following procedure.
(1) From the Top Menu of Remocon Diagnosis Menu, select “4. Version Information” by pressing the [4] button on the remote commander. The following screen appears on the on-screen display.
To return to the Top Menu of Remocon Diagnosis Menu, press [0]
button on the remote commander.