Grundig THARUS 51 LCD 51-9310 DOLBY - Service Mode - Power Supply Regulator board Circuit Diagram
Used semiconductors: UCC3580 – UCC3961 - L4978 – MC34063A – TNY264 – L4973D3V3 – SPP06N80C3(FET) – BUZ90A (FET)
Used semiconductors: UCC3580 – UCC3961 - L4978 – MC34063A – TNY264 – L4973D3V3 – SPP06N80C3(FET) – BUZ90A (FET)

Service and Special Functions
Call up the Service Menu: Button "i"
(EASY DIALOG)
Call up the dialogue line: Buttons
"P+" or "P-" => "OK"
Changing the setting in the dialogue line: Buttons "L+" or "L-" => "OK"
Back to previous menu: "Blue" button
Exit menu: "i" button
Service menu for retailer (code number) 8500.
Changing the setting in the dialogue line: Buttons "L+" or "L-" => "OK"
Back to previous menu: "Blue" button
Exit menu: "i" button
Service menu for retailer (code number) 8500.
ATS Reset
Press mains button "ON " while holding down the "L+" button on the remote control.
- The basic analogue values are loaded.
- The ATS bit is set. When switching on the next time, this option releases the ATS euro plus function. The current program allocation (channels) is cleared.
Press mains button "ON " while holding down the "L+" button on the remote control.
- The basic analogue values are loaded.
- The ATS bit is set. When switching on the next time, this option releases the ATS euro plus function. The current program allocation (channels) is cleared.
Electronic Programme Lock (parental
lock)
Enter the key sequence "7 0 3 8 5 8 0" to cancel your personal code number.
Enter the key sequence "7 0 3 8 5 8 0" to cancel your personal code number.
Software Version Number
Call up the "EASY DIALOG" menu. Pressing the green button indicates the software version number.
Call up the "EASY DIALOG" menu. Pressing the green button indicates the software version number.
Flash Programming
Required equipment
Flash programmer F-Prog 1 / from version 2.0 on or Service Toolbox part number 772004001200.
Required equipment
Flash programmer F-Prog 1 / from version 2.0 on or Service Toolbox part number 772004001200.
Required hardware
Pentium-PC, Microsoft Windows 95
- Free memory of 32MB
- CD-ROM drive
- COM port
- Internet access
Pentium-PC, Microsoft Windows 95
- Free memory of 32MB
- CD-ROM drive
- COM port
- Internet access
Calling up the current TV software
The software can be called up from an area of the Grundig partnerweb (B2B), protected via a Grundig customer number and a password.
Note to downloading the software:
- Start the Internet Browser.
- Input the address http://partnerweb.grundig.com and start.
- Follow the menu guide in "Service => Software Download".
Direct Display Type Adjustment
If the menus can not be displayed any longer due to an incorrect display type adjustment, you can carry out the correct adjustment with the help of key short cuts.
Before and after the direct entry, the unit must be switched off and on again!
The "i", "red" and numeric keys select the desired display type in the service mode. The following digits indicate the display types:
1 LG 20" 4:3
2 NEC 20" 4:3
3 Samsung 22" 16:9
4 NEC 23" 16:9
5 LCD 30" 16:9
Entry of Letters
Call up the "Letter entry" menu via "EASY DIALOG" => "Installation" => "Special functions". You may select between "off", "on" and "mix" for the programme selection letter entry.
Call up the "Letter entry" menu via "EASY DIALOG" => "Installation" => "Special functions". You may select between "off", "on" and "mix" for the programme selection letter entry.
Visible or Invisible "Sound
scale" for all Programmes
Call up the "Sound scale" menu via "EASY DIALOG" => "Installation" => "Special functions".
With "off" selected, no volume bar is displayed.
Call up the "Sound scale" menu via "EASY DIALOG" => "Installation" => "Special functions".
With "off" selected, no volume bar is displayed.
Switching on with Programme
"1" or automatically
Call up the "Switch on" menu via "EASY DIALOG" => "Installation" => "Special functions" .
Set the option "Preset 1" or "Automatic".
With the "automatic" setting, the programme position selected when switching off is selected again when switching the set on again (Last station memory).
Call up the "Switch on" menu via "EASY DIALOG" => "Installation" => "Special functions" .
Set the option "Preset 1" or "Automatic".
With the "automatic" setting, the programme position selected when switching off is selected again when switching the set on again (Last station memory).
"Mega-logic Info" (only if a connected Mega-logic set is identified)
Call up the "Mega-logic info" menu via "EASY DIALOG" => "Installation" => "Special functions".
The Mega-logic control can be switched to "on" or "off".
Call up the "Mega-logic info" menu via "EASY DIALOG" => "Installation" => "Special functions".
The Mega-logic control can be switched to "on" or "off".
Status Display
Call up the "Status Display" menu via "EASY DIALOG" => "Installation" => "Special functions".
You may select the position (top or bottom) where the information about the sound mode and the picture format is displayed.
With the "off" option, no information is displayed when changing the programme.
Call up the "Status Display" menu via "EASY DIALOG" => "Installation" => "Special functions".
You may select the position (top or bottom) where the information about the sound mode and the picture format is displayed.
With the "off" option, no information is displayed when changing the programme.
Automatic Volume
Call up the "Automatic volume" menu via "EASY DIALOG" => "Installation" => "Special functions".
In the "ON" position, the sound IC regulates the volume internally to the normal value (e.g. increased deviation in the case of advertising).
Call up the "Automatic volume" menu via "EASY DIALOG" => "Installation" => "Special functions".
In the "ON" position, the sound IC regulates the volume internally to the normal value (e.g. increased deviation in the case of advertising).
Noise Reduction P1-P…
Call up the "Noise reduction P1-P…" menu via "EASY DIALOG" => "Installation" => "Special functions. For the programmes 1-P… you may set the noise reduction to "off", "low" or "automatic".
"Manual" indicates that one or several programs have different settings.
Call up the "Noise reduction P1-P…" menu via "EASY DIALOG" => "Installation" => "Special functions. For the programmes 1-P… you may set the noise reduction to "off", "low" or "automatic".
"Manual" indicates that one or several programs have different settings.
Picture Sharpness P1-P…
Call up the "Sharpness P1-P…" menu via "EASY DIALOG" => "Installation" => "Special functions".
The picture sharpness is set for all programs.
Call up the "Sharpness P1-P…" menu via "EASY DIALOG" => "Installation" => "Special functions".
The picture sharpness is set for all programs.
Colour Match
Call up the "Colour match" menu via "EASY DIALOG" => "Installation" => "Special functions".
The colour match (luma delay) is set for every programme.
Call up the "Colour match" menu via "EASY DIALOG" => "Installation" => "Special functions".
The colour match (luma delay) is set for every programme.
White Balance
Call up the "White balance" menu via "EASY DIALOG" => "Installation" => "Dealer service menu" => Code number "8500" => "Picture settings".
Adjust the values for "red", "green" and "blue" so that a white picture is obtained.
Note: When calling up the menus again, the value of the largest component is always 511, the other values are converted.
Black Level Balance
Call up the "Black level balance" menu via "EASY DIALOG" > "Installation" > "Dealer service menu" > Code number "8500" > "Picture settings".
Select the AV position (black picture) on the TV set.
Adjust the "red", "green" and "blue" values in such a way that the transition of the colour scale (test pattern) is at the same place for all 3 colours (R,G,B just visible). The control values for the components should remain as close as possible to the given value 248.
Adjust the offset in such a way that the colour window is located inside the centre frame.
Switching the Blue Screen Background On
and Off
Call up the "Blue screen" menu via "EASY DIALOG" => "Installation" => "Dealer service menu" => Code number "8500" => "Picture settings".
Select "on" or "off".
Call up the "Blue screen" menu via "EASY DIALOG" => "Installation" => "Dealer service menu" => Code number "8500" => "Picture settings".
Select "on" or "off".
Factory Settings
Press the "i", "red" and OK buttons to call up the factory settings.
Press the "i", "red" and OK buttons to call up the factory settings.
Watchdog On/Off
Call up the "Watchdog" menu via "EASY DIALOG" => "Installation" => "Dealer service menu" => Code number "8500" => "Special functions".
If the Watchdog timer is not reset in regular intervals, a new start is initialized.
Set the Watchdog to "off" or "on".
Call up the "Watchdog" menu via "EASY DIALOG" => "Installation" => "Dealer service menu" => Code number "8500" => "Special functions".
If the Watchdog timer is not reset in regular intervals, a new start is initialized.
Set the Watchdog to "off" or "on".
Front-LED
Call up the "Front-LED" menu via "EASY DIALOG" => "Installation" => "Only for the retailer" => Code number "8500" => "Hardware equipment".
Select "3 Colors" or "1 Color".
Call up the "Front-LED" menu via "EASY DIALOG" => "Installation" => "Only for the retailer" => Code number "8500" => "Hardware equipment".
Select "3 Colors" or "1 Color".
SMPS CIRCUIT DIAGRAM

SMPS-Split

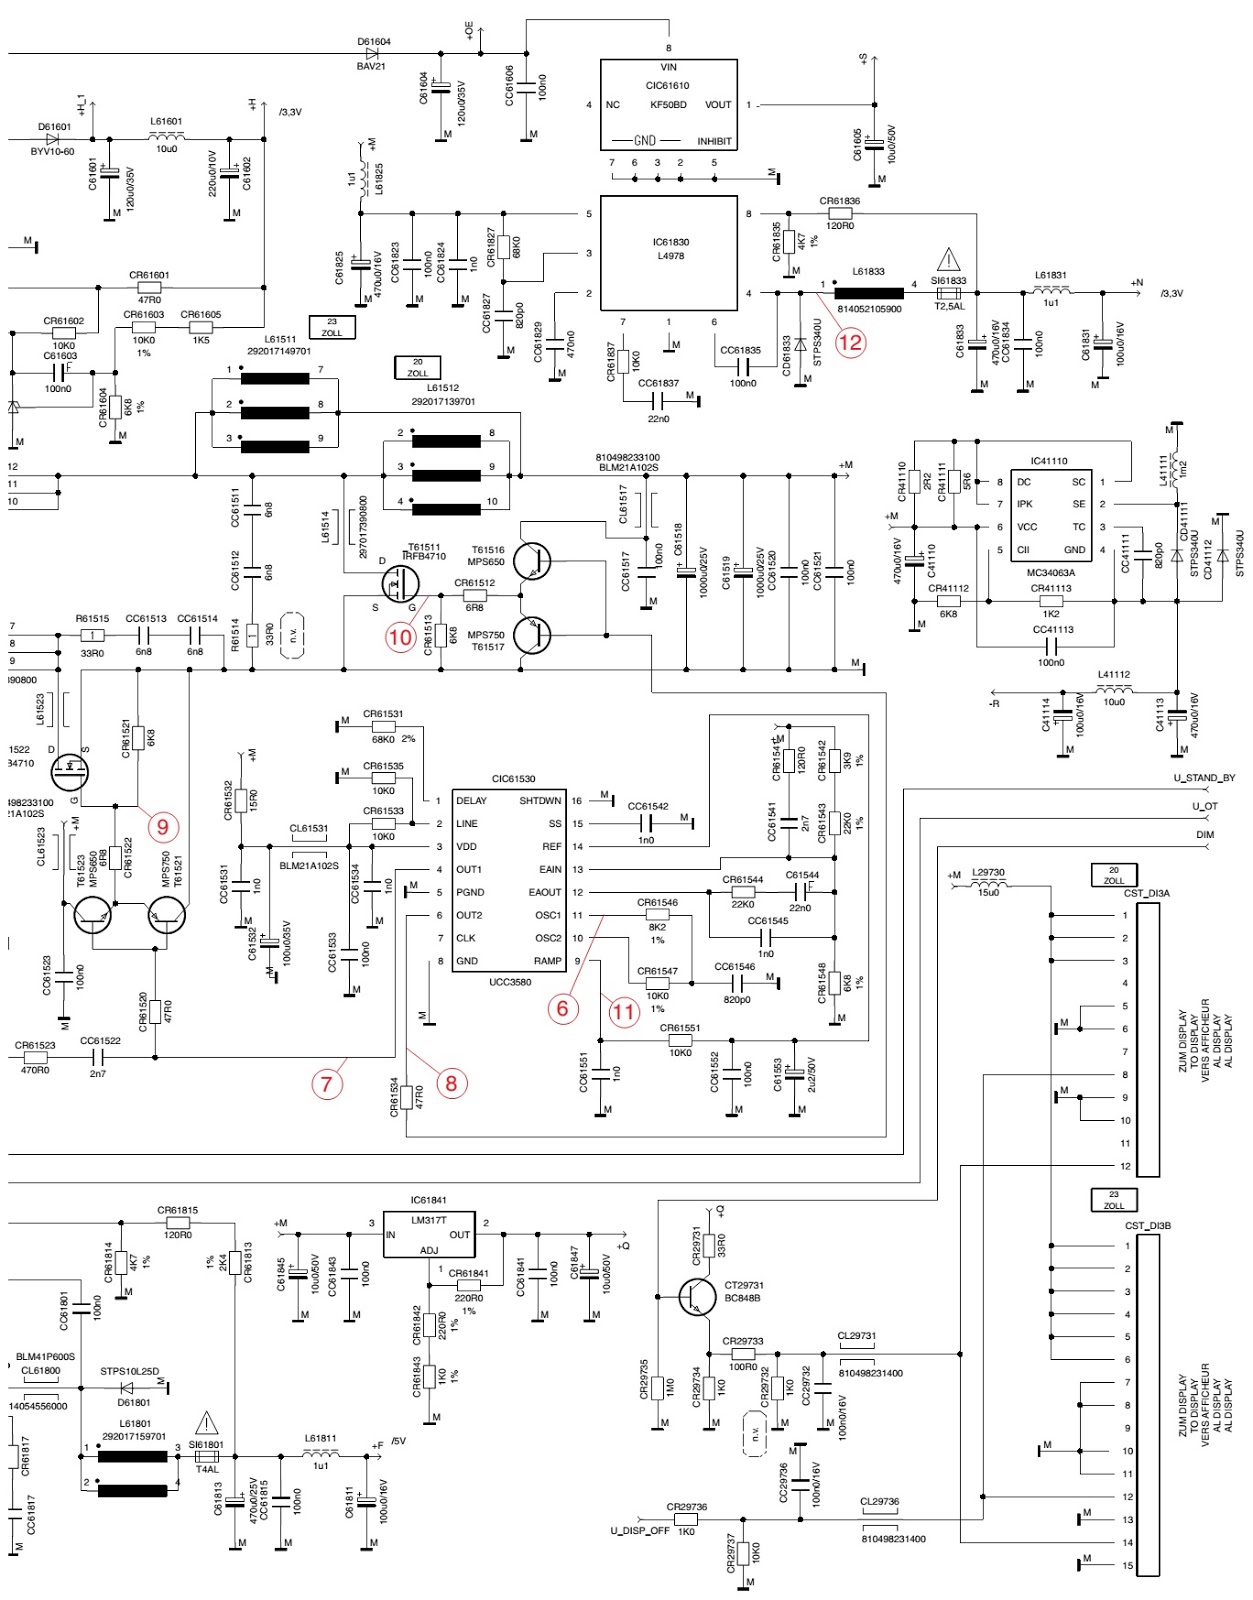
Click on the Schematics to Magnify