
You can use the four (arrow) buttons to set a password and
prevent unauthorized use of the projector. When enabled, the password must be
entered after you power on the projector.
IMPORTANT: Keep the password in a safe place. Without the
password, you will not be able to use the projector. If you lose the password,
contact your re-seller for information on clearing the password.
- Press the MENU button to open the OSD menu.
- Press the cursor ◄►button to move to the Installation Imenu.
- Press the cursor ▲▼button to select Advanced.
- Press ◄-| (Enter) / ►.
- Press the cursor ▲▼button to select Security Lock.
- Press the ◄►button to enable or disable security lock function.
- You can use the cursor buttons ◄▲▼► either on keypad or IR remote control for password entry. You can use any combination including the same arrow five times, but not less than five. Press the cursor buttons in any order to set the password. Select Menu to exit the dialog box.
- The password confirm menu appears when user press the power-on key in case the Security Lock is enabled.
- Enter the password in the order.
Still pressed “MENU” key and plug the AC power cord
when Power LED going to flashing => Phase a short time => flash three
times.
Factory Reset
- Press the cursor ▲▼button to move up and down in the Installation IImenu. Select the
- Factory Reset sub menu and press ◄-| (Enter) / ►to reset all the menu items to the factory default values.
- Turn on the projector, press the” MENU “button on the keypad or IR controller, Then select “Installation II”, then press“ Down ”button and select “ Advance ”
- Press “Right” button on the keypad or “ Enter “button by remote controller, then select “Lamp Hour Reset”, press “Right” button or “ Enter” button.
- Press “ Enter “ button twice by remote control, then press “ (▲) (▼) (◄) (►)”by remote control.
Be sure to turn off and unplug the projector at least 30
minutes before replacing the lamp. Failure to do so could result in a severe
burn.
- Loosen the captive screw on the lamp compartment cover.
- Remove the lamp compartment cover.

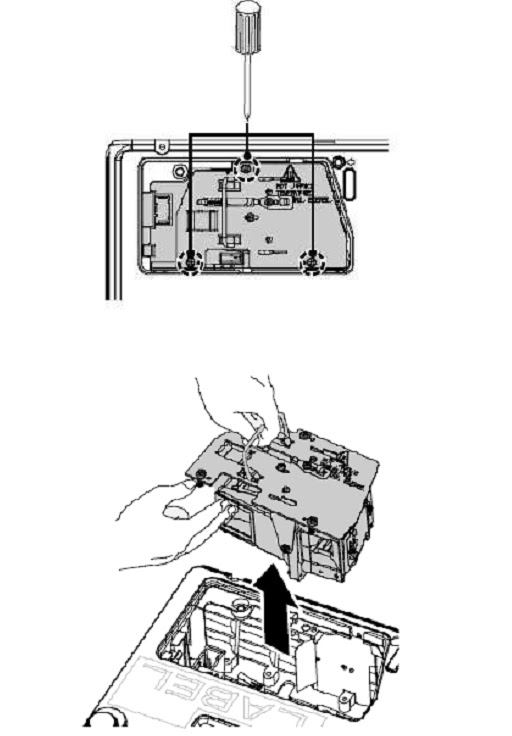
- Remove the three screws from the lamp module.
- Lift the module handle up.
- Disconnect the lamp connector.
- Pull firmly on the module handle to remove the lamp module.
The lamp module must sit securely in place and the lamp
connector must be connected properly before tightening the screws.

LAMP TIME RESET
- Press the MENU button to open the OSD menu.
- Press the cursor ◄► button to move to the Installation II menu.
- Press the cursor button to move down to Advanced.
- Press the cursor ▲▼ button to move down to Lamp Hour Reset.
- Press the cursor ►or enter button. A message screen appears.
- Press ▼ ▲ ◄ ►buttons to reset the lamp hour.
- Press the menu button to get back to the Installation II.
ERROR MESSAGES
