CLICK ON THE PICTURES TO ZOOM
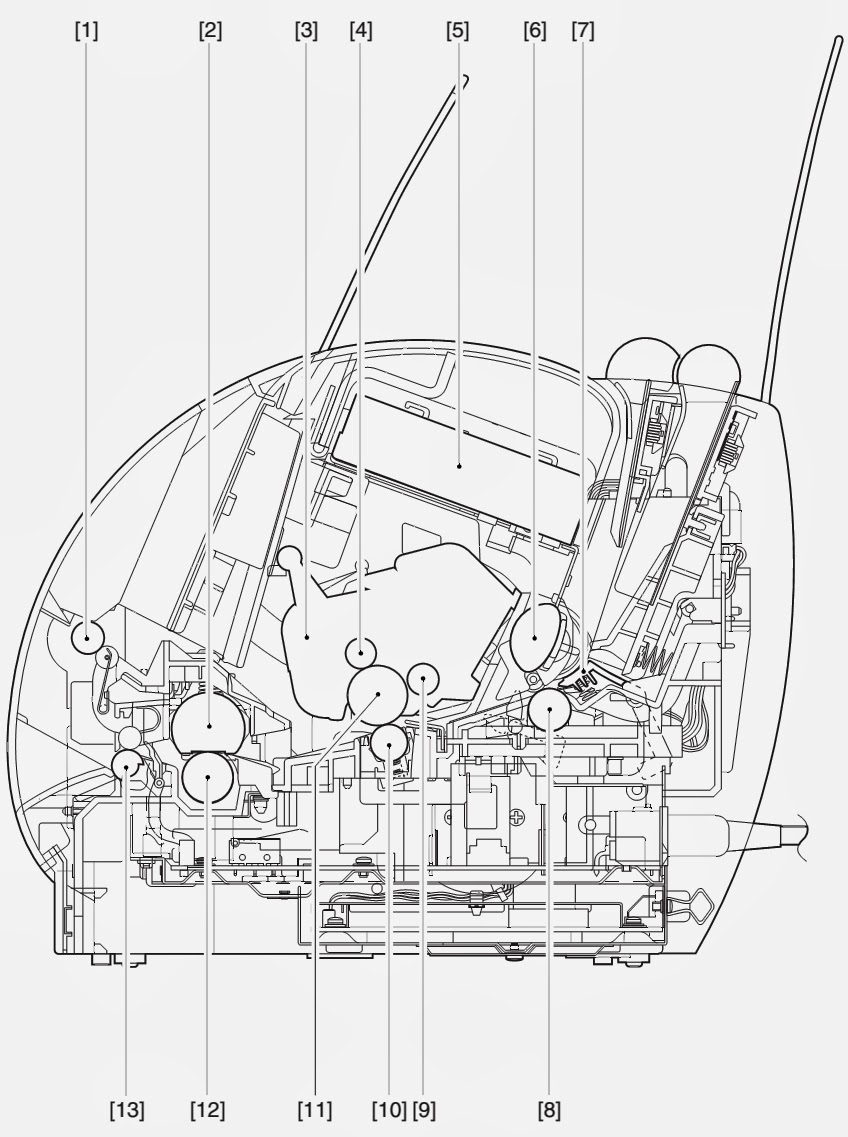
[1]: Face-down delivery roller.
[2]: Fixing film unit
[3]: EP-22 cartridge
[4]: Primary charging roller
[5]: Laser/scanner unit
[6]: Pick-up roller
[7]: Separation pad
[8]: Feed roller
[9]: Developing cylinder
[10]: Transfer charging roller
[11]: Photosensitive drum
[12]: Pressure roller
[13]: Fixing delivery
roller
Remove the rear cover, left/right cover, and upper cover.
To enable the disconnection of the connectors, peel off the
Warning label (laser) halfway.
Disconnect the 2 connectors, and remove the 4 screws; then,
detach the Laser/scanner unit.
Do not disassemble the Laser/scanner unit; you will not be
able to adjust it in the field.
There is no Warning label (laser) used on the Laser/scanner
unit offered as a service part. If you are replacing the assembly, remove the
label from the existing assembly, and transfer it to the new
assembly. Or, use the newly available Warning label (service part). Be sure
also to fully hide the connector openings from view.
Drive Assembly
Remove the rear cover and the left/right cover.
Remove the 2 screws and 2 screws equipped with a washer.
Slide out the drive assembly slightly, and disconnect the connectors to remove
the drive assembly.
Feed Assembly
Remove the engine controller assembly.
Free the 2 claws, and remove the 2 gears and the screw.
Push the 2 claws, and remove the bushing.
Remove the 2 screws, and disconnect the 2 connectors; then,
remove the feed assembly.


Delivery Assembly
Open the cartridge cover.
Remove the boss, and remove the face-down delivery roller
bushing; then, slide the face-down delivery roller to the right to detach.
Pull the pressure release lever to the front to release the
pressure.
Remove the 2 screws, and slide the delivery assembly to the
right to detach.


Fixing Film Unit
Remove the rear cover and the left/right cover.
Remove the delivery assembly.
With the pressure release lever shifted up, push down on the
fixing pressure unit (left/right) from above; then, slide it to the rear to
detach.
Disconnect the connector.


Disconnect the connector, and free the harness from the
harness guide.
Remove the fixing film unit.
