
If mechanism problem occurs during normal or aging mode, the
error code is “remembered” and shown on the FL display.
Reset Condition of Error Code
a. During cold start of micro-processor IC.
b. Restart of ageing mode for the mechanism unit.
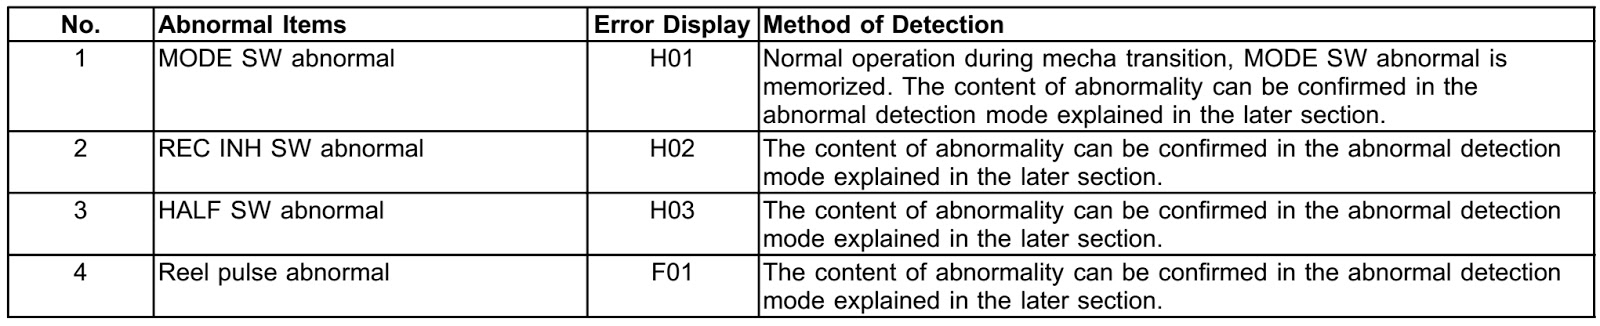
Mechanism Error Code.
CLICK ON PICTURES TO ZOOM.
Click ß
at the top left of the browser to come back.
When the mechanism unit stops due to error during aging
model, error code misremembered and counts of the errors are displayed on the
FL display.
SELF DIAGNOSIS FUNCTION
To enter self diagnosis mode

Cassette Mechanism Test (For error code H01, H02, H03, F01)
- Press “TAPE, DECK 1/2” to select Deck 2.
- Load a cassette tape with the erasure prevention tab, remove from left side only and close the cassette holder.
- Press “FASTFORWARDMEMORY” (Tape will be stop after 2 seconds)
- Load a cassette tape with the erasure prevention tab, remove from right sideonly and close the cassette holder.
- Press “REVERSE FM MODE/BP” (Tape will be stop after 2 seconds)
- Load a pre-recorded tape with both side record tabs intact and close the cassette holder.
- Press “PLAY/TUNE/TIME ADJ UP” (After TPS function, tape will stop automatically)
- Press “REC/STOP” (Tape will not move)
- Press “STOP/TUNE MODE” to indicate Error code. If several problem exist, error code will change each time when “n/STOP” is pressed. (e.g. H01 -->H03 -->F01 .....etc.)
- Press “TAPE, DECK 1/2” to select Deck 1.
- Repeat step 2 to 9 to test Deck 1. (Tape Deck 1 will not check H02 because of no recording function).
- Press [►/pause, CD] (set to CD Mode) on main unit.
- Press “CD DIRECT PLAY (1)” and [Eject, open/close] button on main unit.
- Press [eject, open/close] to close the tray.
- Press “CD DIRECT PLAY (5)” and [eject, open/close] wait until the tray is open.
- Press [eject, open/close] and remove the CD.
- Press [eject, open/close] to close the tray.
- Press “n/STOP” to indicate Error Code. If several problem exist, error code will change each time when “n/STOP” is pressed. (e.g. F15 --> F26 --> F16 ....etc).
TO CLEAR ALL ERROR CODES
- Press and hold [stop] button for 5 seconds.
- FL indicator shows “CLEAR” for 1 second and change to “T”
Press [Power] button
on main unit or remote control.
Power Amplifier Failure (F61)
When power amplifier
fail, F61 will indicate automatically.
Abnormality detection for Deck Mechanism
Abnormality detection for CD/Changer

Power supply related error
Error Display: F61
- During normal operation, if DCDET becomes ‘L’, normal POWER OFF process shall not be executed, PCNT shall be switched to ‘L’ immediately. GOODBYE shall not be displayed and the error display F61 will be displayed instead. 2 seconds after the F61 display, ECONO shall be set to ‘L’ and FL display shall be turned off.
- The error content shall be memorized when the abnormality occurs and can be displayed in the C-mecha self-diagnostic mode described later.
CD TEST MODE
CD test mode is provided to check CD unit without connecting
to changer loading mechanism. This mode shall operate CD PLAY with CD unit
being connected only and CD Automatic Alignment result is shown on FL display.
Under CD test mode, pressing the numeric key ‘0’ on the
remote controller will display the auto adjustment result. FLOCK, TLOCK and
CLVS status shall be shown as below:

During the above display, executing CD PLAY will display auto
adjustment result for CD PLAY mode.
CD MECHA AGING TEST MODE

Functional summary of CD aging test mode. It is for the purpose to determine the
reliability of the CD changer.
First, enter into self-diagnostic mode.
In the self-diagnostic mode, switch the SELECTOR to [►/PAUSE,
CD] and press [|<</REW/v]. It will enter into CD aging test mode.
When in CD aging test mode, the following operation will
begin and repeated:
- [DISC STOCKER] àDISC LOAD àTRAY OPEN (2 secs) àTRAY CLOSE] as one count.
- DISC 1 àDISC 2 àDISC 3 àDISC 4 àDISC 5 àDISC 1........repeating this endlessly. While performing the above operation, the FLdisplay will show the number of its operations starting from 00001.
To exit CD aging test mode, press [POWER]
button, the tray will return to its PLAY position and power will be off.
MICON ROM CHECKSUM AND VERSION DISPLAY MODE
To enter into Micon ROM checksum and Version Display Mode.
- Enter into Self-Diagnostic Mode.
- In the Self-Diagnostic Mode, Press [►/PAUSE, CD] twice.
The Software Version No. & Micon Software Checksum
differs from set to set.
The ROM Checksum is calculated on demand, not hard coded.
The ROM Checksum is calculated by talking the arithmetic SUM
of the ROM contents from the program’s START address until the END address.
START address = [1080]H
END address = [FFFD]H