
Hid adopts 'Philips' TDA9321, TDA9332 IIC TV processing chip and Pixelworks PW1230 progressive chip for 60Hz \ 85Hz progressive. Its CPU adopts Toshiba TMP87PS38N, software was masked into chips by OTP, modifications may subject to feedback from production of from market.
ALIGNMENT

The chassis layout in IIC bus structure, a majority of status could be adjusted through manufacture menu, by taking following steps:
- Be sure that PIP is OFF.
- Press {EXCHANGE => SHIFT => STILL => MENU} by the remote control to enter factory adjustment menu.
- To 'EXIT" factory menu, press "DISPLAY".
Before adjustment of convergence board connected to chassis, adjust variable resistor W2 to set output DC voltage level of RH, RV, GH, GV, BH, BV at or close to zero. [PIP] in remote control is the key access to convergence factory adjustment.
- Press '5' to choose item for adjustment.
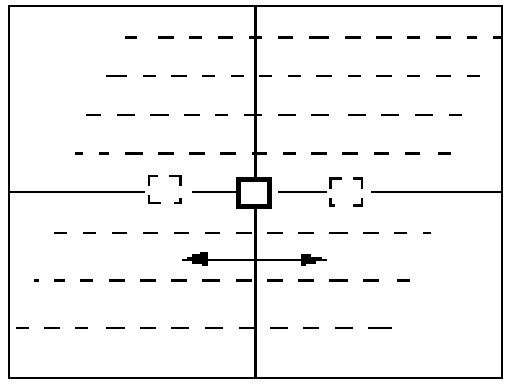
- Horizontal Fond Phase adjustment.

- Move cursor to screen horizontal center.
Vertical Phase Adjustment

HORIZONTAL PHASE FINE ADJUSTMENT
Move peak of waveform to screen horizontal center.

VERTICAL PHASE FINE ADJUSTMENT
Move peak screen to vertical center.

VERTICAL PHASE COARSE ADJUSTMENT.

HORIZONTAL PHASE COARSE ADJUSTMENT
- Press Volume Key {Vol (>) & Vol (<)} to set data.
COARSE ADJUSTMENT
- Password for Coarse Adjustment. {1 -> 3 -> 7}.
- Press '5' for color selection, set the fond color as Green.
- Press '2' to move cursor straight Upward. Press '8' to move cursor straight Downward. Press '4' to move cursor left and press '6' to move cursor right.
CURSOR LOCATIONS AND ITS CORRESPONDING ADJUSTMENTS:

H1: Horizontal leaner adjustment
H2: Horizontal amplitude adjustment.
H3: Horizontal center adjustment.
H4: Horizontal obliquity adjustment
H5: Horizontal pincushion adjustment.
H6: Horizontal Arc adjustment.
V1: Vertical obliquity adjustment.
V2: Vertical center adjustment.
V3: Vertical amplitude adjustment.
V4: Vertical trapezoid adjustment.
V5: Vertical pincushion adjustment.
- Press {Vol (>) & Vol (<)} for Data Modification.
- Press '5' to set fond color as Green and Red, set cursor color as Red. * Repeat above steps for red color adjustment.
- Press '5' to set fond color in Green and Blue, set cursor color as Blue. * Repeat above steps for blue color adjustment.
FINE ADJUSTMENT
- Password for fine adjustment: {1 -> 7 -> 9}
- Press '5' for color selection, set the fond color as Green.
- Press '2' to move cursor Up.
- Press '8' to move cursor Down.
- Press '4' to move cursor Left.
- Press '6' to move cursor Right.
- Move the cursor to the location that subject to adjustment.
- Press Volume Key (>) for horizontal data increase.
- Press Volume Key (<) for horizontal data decrease.
- Press Prog Up for vertical data increase.
- Press Prog Dn for vertical data decrease.
Press "BROWSE", move the whole vertical line rightward.
Press "STILL", move the whole vertical line leftward.
Press "PRO" Up, move the whole horizontal line upward.
Press "PRO" Dn, move the whole horizontal line downward.
- Press '5', set fond colors as Green and Red, set cursor color as Red, repeat above steps for Red color adjustment.
- Press '5', set fond color as Green and Blue, set cursor color as Blue, repeat above steps for Blue color adjustment.
- Press '5', set fond color in Green, Red and Blue, set cursor color as Green, Red and Blue in turn. Repeat steps above to adjust fond color in Red and Blue.
DATA SAVING
Green fond will display in screen with cursor in color of Red, Green and Blue when data is saved, indicating Adjustment mode Exited. At this time further data saving could only be preceded in either coarse adjustment mode or fine adjustment mode. Press "EXCHANGE" for saving. Modification of data require corresponding password.
DELETING DATA
- Password Delete {1 -> 3 -> 9}
- As password entered, Red cross-hatch and cursor in Red, Green and Blue at the center of the screen will come out with indications to delete all coarse adjustment and fine tuning data in current mode.
- Press "Mode" to make sure to delete all coarse adjustment and fine adjustment data in current mode. Blue square-postern and cursor in Red, Green and Blue at the center of the screen will come out when data deleted.
- Press"'Mute" to Exit Convergence mode.
Universal remote control set-up codes - 1258 0727 0806 0826 0412 0698